
GIF was created by CompuServe in 1987, and it still reduces every frame to 256 colors max. So no, HEIC to GIF is not a clean swap, it’s a deliberate loss of color detail that often shows up as banding, posterization, and washed-out skin unless you tune the palette and dithering.
The common advice is wrong because it treats conversion like a filename change. HEIC can carry much richer color and tone than GIF, and GIF’s indexed palette model forces you to throw most of that away before the file even finishes encoding.
Table of Contents
- Why HEIC to GIF Is a Quality Trade-Off, Not a Simple Switch
- The Conversion Pipeline You Should Run in Your Head
- Choosing a Palette Strategy for Single-Frame GIFs
- Dithering Options and What Each One Actually Does to Your Photo
- Animated HEIC to GIF Workflows and Common Failure Modes
- Running the Conversion in Your Browser Step by Step
- Picking the Right Output Format and a Pre-Sharing Checklist
Why HEIC to GIF Is a Quality Trade-Off, Not a Simple Switch
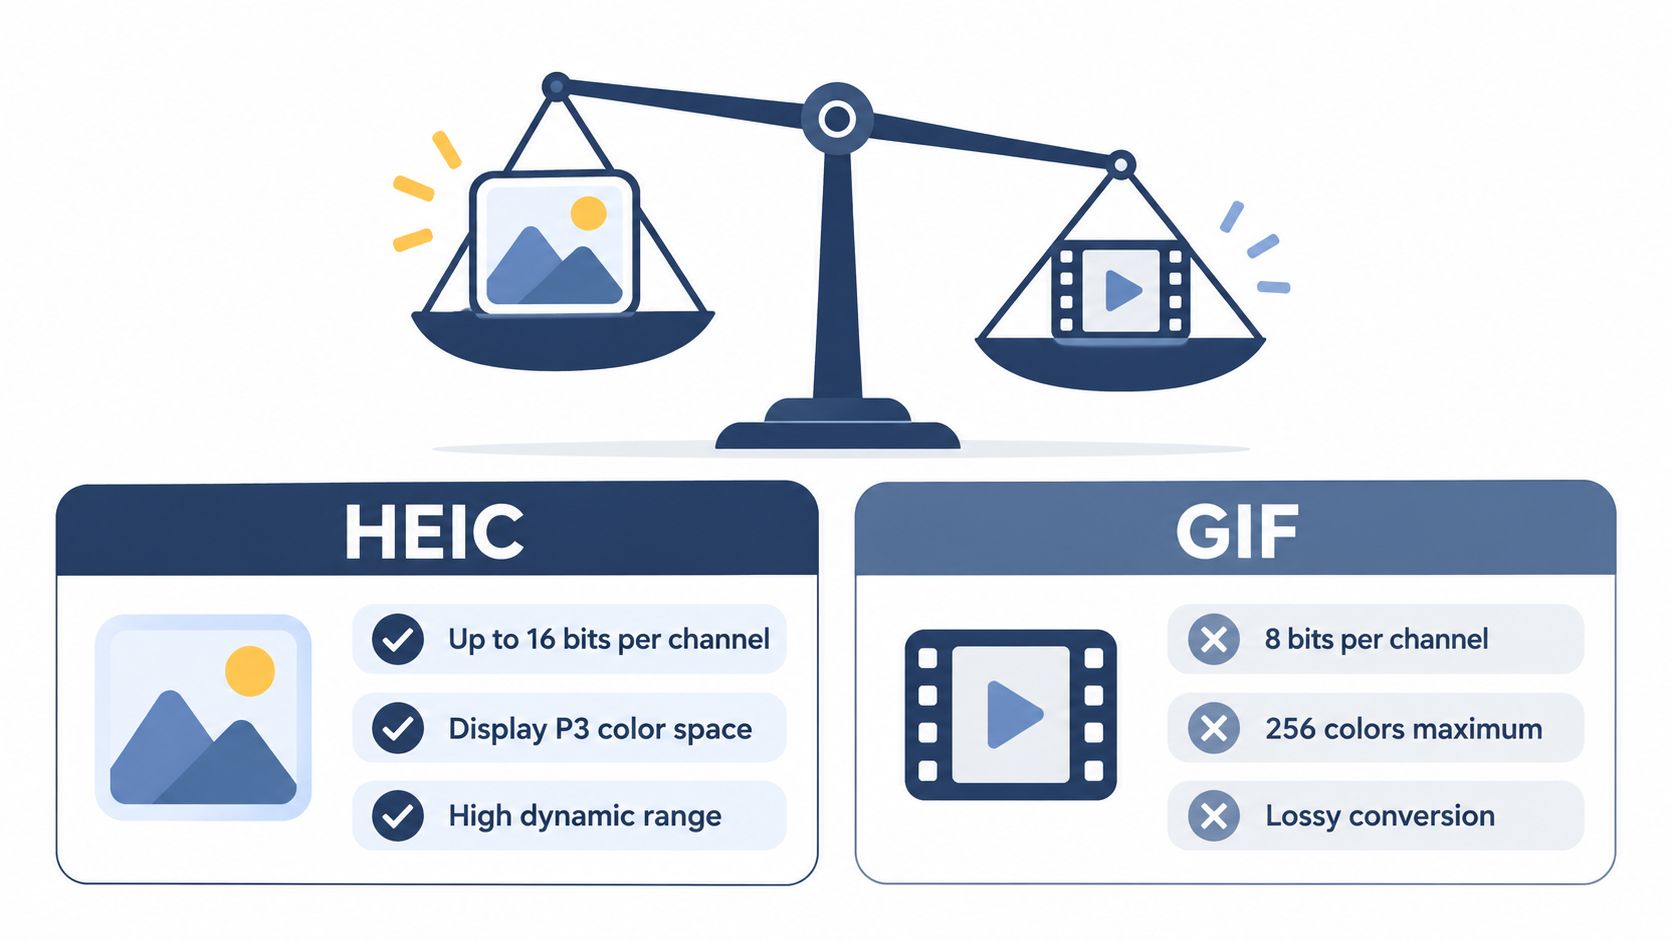
Treat HEIC to GIF as a downgrade decision, not a format swap. HEIC can carry richer color and keep camera data that affects orientation and appearance, while GIF is an older indexed format built for compact delivery and animation, not photographic fidelity (Graphics Interchange Format).
What GIF keeps, and what it strips out
GIF89a supports multiple images in one file, frame delays, transparency, and metadata hooks, but the image model stays simple. Each frame still has to fit an indexed palette, which means a modern HEIC photo must be squeezed into no more than 256 colors per frame before it becomes a GIF (Library of Congress GIF overview).
That cut hurts portraits first. Cheeks, lips, and shadows can look rough, skies lose smooth gradients, foliage turns patchy, and semi-transparent areas have to be flattened or approximated because GIF only handles transparency in a limited way (W3C GIF89a specification).
Practical rule: if the image depends on subtle tone, wide-gamut color, or clean transparency, GIF is the wrong target. Use it for stickers, logos, icons, and short loops, not for photos you’d want to print or inspect closely.
The decision rule I actually use
I ask one blunt question. Does the file need photographic fidelity or broad compatibility? If it’s a graphic, a meme, a product sticker, or a short animation, GIF earns its place. If it’s a photo with skin tones, gradients, shadows, or iPhone color richness, JPG, WebP, or AVIF usually serves you better.
That is the right way to judge the format. GIF can still be the correct deliverable, but only when you accept that simplicity and reach come at the cost of color depth.
The Conversion Pipeline You Should Run in Your Head
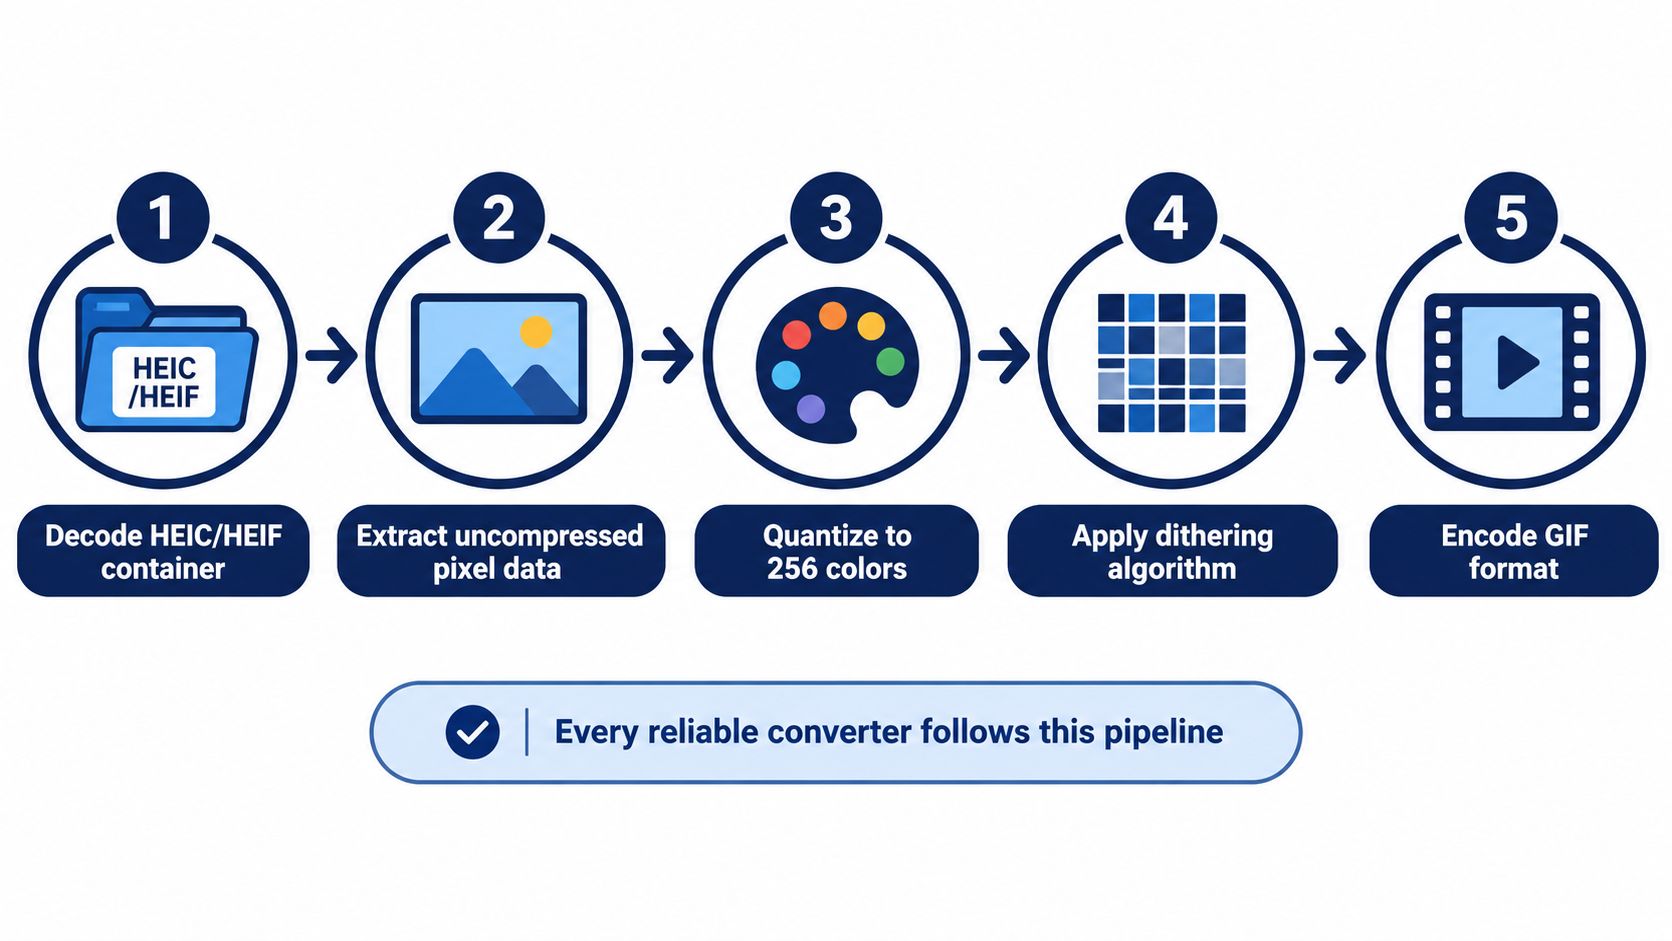
A HEIC to GIF conversion is a downgrade pipeline, so treat it that way. If the tool cuts corners or runs the steps in the wrong order, the result turns muddy, washed out, or oddly crunchy. The sequence matters: decode, color convert, resize, quantize, then encode.
Start by decoding the HEIC cleanly
Decode the HEIC or HEIF container first, and keep orientation plus any embedded ICC profile intact. HEIF carries ICC color information through the ISO Base Media File Format color-information box, so skipping it is how iPhone photos end up flat or off in the output (Library of Congress HEIC notes).
After that, move the image into the display space you want. For GIF, that means sRGB in practice, because it is the safest compatibility target and keeps the rest of the pipeline predictable. If you wait until after quantization, the palette has to solve a color-management problem it was never built for.
Resize before you quantize
Resize to final dimensions before palette generation. That order matters because downsampling after quantization can smear colors and make already-limited gradients look dirtier than they should.
Then generate the indexed palette and encode each pixel as an 8-bit palette index. GIF palettes only allow powers of two from 2 through 256 entries, so every pixel points to a palette color instead of storing full RGB values (GIF89a specification).
The palette stage is where the quality trade-off becomes obvious. If you start with skin tones, skies, or subtle shadows, every bad decision shows up fast. For a plain graphic, the same loss is usually easier to live with.
Treat the last step as a quality decision
Encoding is where the look gets locked in. If the converter offers dithering, disposal, or palette controls, use them on purpose, because that is the difference between a clean result and a file that looks like it was filtered through a bad webcam.
What is a HEIC file and how it behaves helps if you still treat the source like “just a photo.” It is a container with color and metadata decisions baked in.
Choosing a Palette Strategy for Single-Frame GIFs
For a still image, palette choice is the whole game. You’re not just picking colors, you’re deciding how much of the original photo survives the collapse from full-color HEIC into indexed GIF. The wrong palette strategy can make a decent portrait look cheap in seconds.
Fixed, global, and adaptive palettes are not interchangeable
A fixed palette, like web-safe or grayscale, is the bluntest option. It’s fine for charts, line art, and simple UI graphics, but it’s a poor fit for most photos because it doesn’t react to the source image at all.
A global adaptive palette is built from the whole image, so it keeps colors consistent across the frame and usually produces a smaller file. That makes sense for screenshots, logos, and graphics with controlled color sets. The downside is obvious on photos, because a 256-color global palette can flatten skin transitions and sky gradients quickly.
A local palette is more common in animation, but for a one-frame GIF it’s still worth understanding because some tools expose the same control for stills and sequences. It can preserve more detail in one area, but consistency suffers if you’re thinking beyond a single frame.
My rule: for photographs, start with adaptive quantization and pair it with dithering. For graphics, use a tight global palette and keep it simple.
Palette size should follow the image, not habit
Smaller palette sizes make sense when the image already has a limited color story. Larger palette sizes usually preserve more nuance, but they can also push file size up and still won’t restore color that GIF can’t store.
| Palette size | Typical use case | File size impact | Color fidelity |
|---|---|---|---|
| 32 | Flat graphics, icons | Small | Low for photos |
| 64 | Simple illustrations, UI assets | Small to moderate | Moderate for limited-color sources |
| 128 | Screenshots, mixed graphics | Moderate | Better, but still constrained |
| 256 | Photographs, detailed stills, richer scenes | Largest of the palette options | Best GIF can offer |
If you’re converting a photo, 256 is usually the default starting point, not because it’s perfect, but because it gives dithering the most room to work. If you’re converting a logo or a sticker, smaller can be smarter.
Dithering Options and What Each One Actually Does to Your Photo
Dithering gets sold like a checkbox, but it’s really the visual compromise layer between full-color HEIC and palettized GIF. If the palette is too small, dithering decides whether the missing colors become clean gradients, visible texture, or hard steps. The difference is easy to see in skies, faces, and shadow falloff.
None, ordered, and error diffusion behave very differently
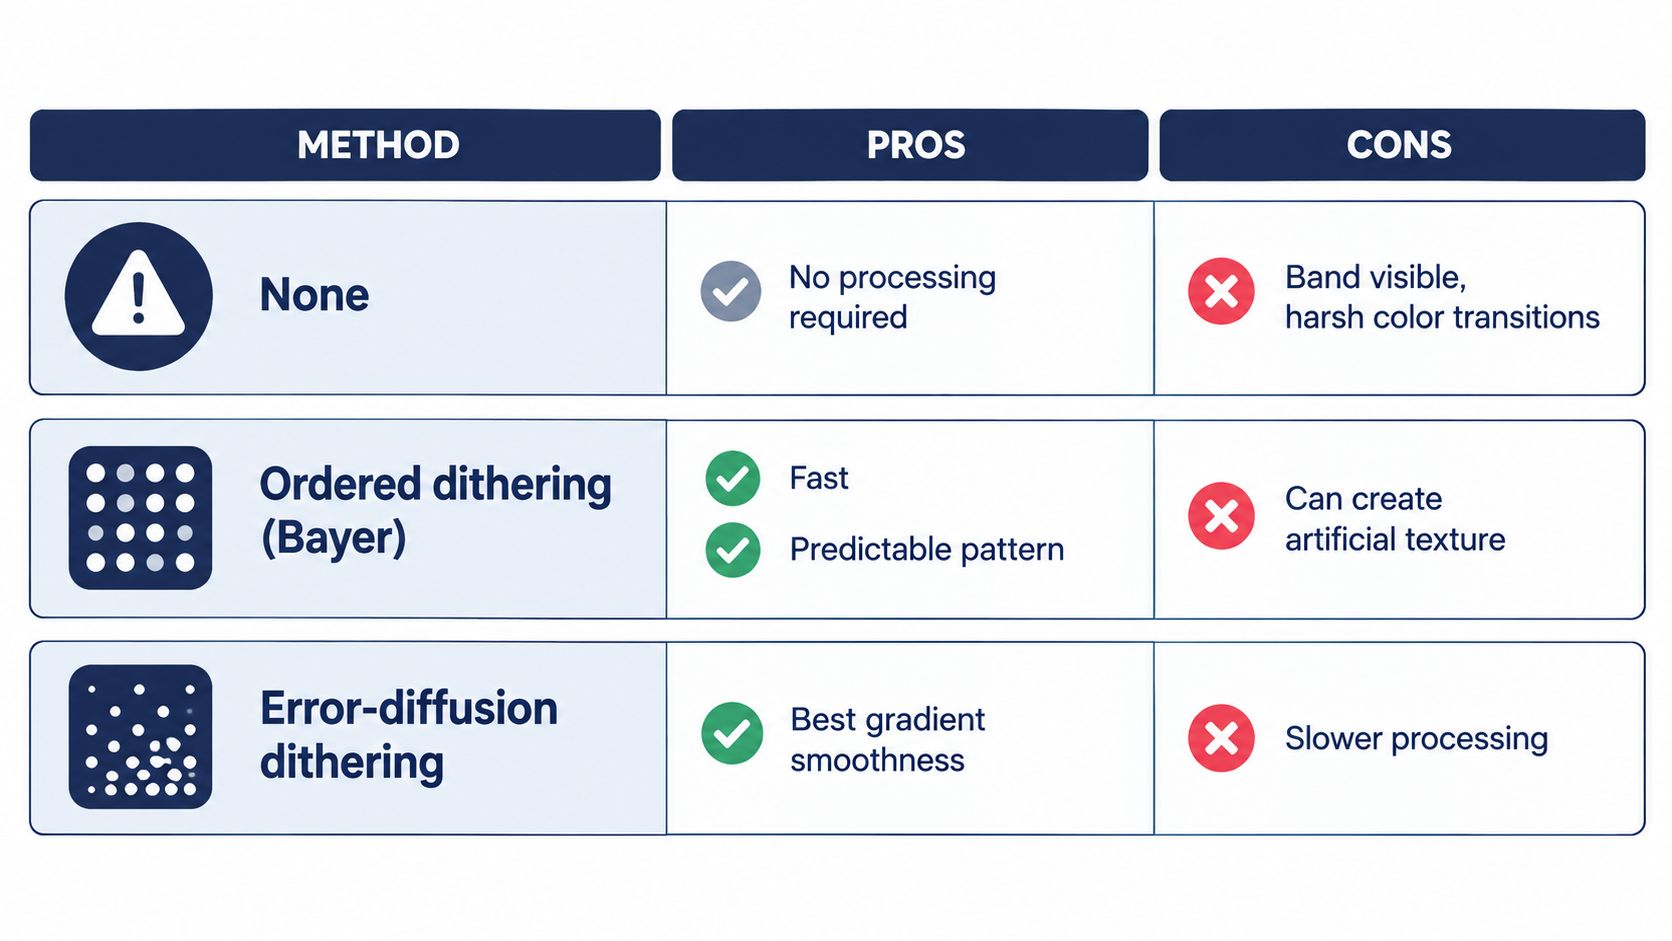
No dithering gives you the cleanest file in the abstract and the ugliest gradients in practice. It often creates hard banding in skies, cheeks, and soft shadows, because the palette has to jump from one tone to the next without any optical smoothing.
Ordered dithering uses a fixed pattern, often described like a Bayer grid. It’s fast and predictable, and it can work well for graphics, but on portraits it introduces an artificial texture that feels like grain laid over the whole frame.
Error-diffusion dithering, including Floyd-Steinberg style methods, usually gives the best photographic result. It pushes quantization error into neighboring pixels, which makes gradients look smoother, but the trade-off is visible grain. That grain is often better than banding, but don’t pretend it’s invisible.
Pick the artifact you can live with
Dithering never restores missing colors. It only simulates them. That’s why a heavily dithered image can feel noisier even when it’s technically better than the banded version, especially in smooth skin or blue-sky areas.
If the source is a portrait, use error diffusion first. If the source is a logo, meme, or screenshot with hard edges, ordered dithering or even none can be the right call. If the image already has strong texture, don’t add more texture unless you have to.
GIF dithering controls explained in a practical converter is worth a look if you want a tool-specific starting point without guessing at the settings.
Animated HEIC to GIF Workflows and Common Failure Modes
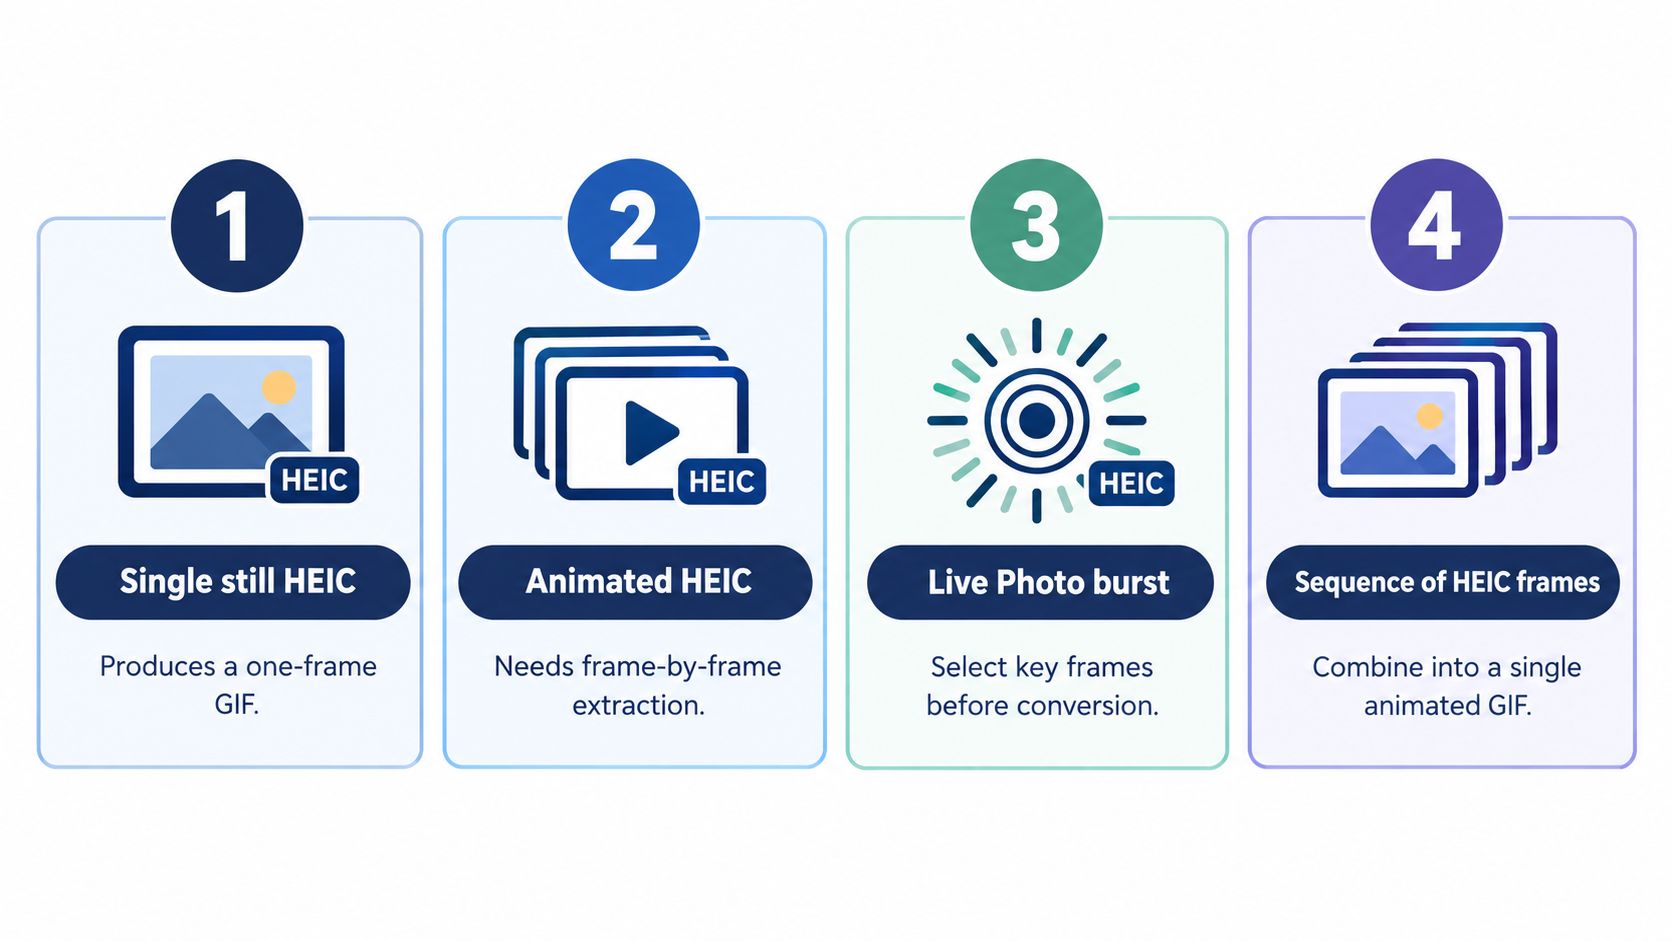
Animation changes the problem completely. A still HEIC becomes a one-frame GIF, but an animated HEIC, a Live Photo burst, or a sequence of HEIC frames needs frame extraction before the GIF encoder can do anything useful. Skip that step and you don’t get animation, you get a flat still.
Frame handling is where most GIFs go wrong
Every frame has to be normalized to the same width, height, color space, and orientation before encoding. After that, you choose between a global palette for consistency or local palettes for better per-frame detail. Global palettes reduce flicker, while local palettes can keep individual frames looking richer at the cost of stability.
GIF animation stores delay in hundredths of a second, and the format can represent delays up to 655.35 seconds through that field (GIF animation details). The disposal mode matters too. Use 1, do not dispose, for cumulative drawing, 2, restore to background, when each frame should clear its area, and 3, restore to previous, when a frame is only temporary.
The three failure modes I see most often
Trails usually mean the disposal mode is wrong. If moving elements leave ghost images behind, the encoder is telling the player not to clear the frame the way it should.
Flicker usually comes from per-frame palette variation. Each frame looks fine on its own, but the colors shift just enough between frames to feel unstable when played back.
Slow playback usually comes from viewers clamping tiny delays. The file says one thing, the player decides another, and the animation feels heavier than intended.
Validate the result in at least two decoders. Disposal behavior and short delays can vary across viewers, and if you only test in one place, you’re guessing. GIF animation is for short, simple loops, not cinematic motion, so keep expectations realistic.
Running the Conversion in Your Browser Step by Step
A browser converter should put the decisions in your hands and keep the rest out of the way. Start by dropping in your HEIC, HEIF, or HIF files, or use the file picker if that is faster. Batch conversion is the sensible move for a pile of iPhone shots. Then choose GIF as the output and decide whether you are exporting a still frame or an animation.
Set the content first, then tune the output
For portraits, use error-diffusion dithering. It keeps skin gradients from breaking into harsh steps. For screenshots and graphics, ordered dithering or no dithering at all is usually cleaner, because you are not trying to fake photographic shading.
Resize before export if the source is larger than you need. A fixed maximum edge keeps the file under control without shredding detail, and that is the same approach I use for web assets. Keep the original size only when the extra detail matters.
Don’t break orientation or color
Apply orientation correction before you save, so the photo comes out upright instead of sideways. Check color handling too. If the source came from an iPhone in Display P3, it needs careful conversion before it is flattened into a GIF-safe space, or you will get the flat, washed-out look that makes color work look careless.
Privacy matters as well. ConvertHEICto GIF converter processes files locally in the browser with WebAssembly, so nothing gets uploaded to a server and there is no server-side copy to worry about. That is the right choice for family photos, client work, or anything sensitive.
When the export finishes, download the GIFs one by one or pull the ZIP if you ran a batch. For portraits, I would keep local processing, convert to sRGB, resize only when needed, and use error diffusion. For screenshots, I would keep the palette tight and the dithering simple. For short animations, I would check disposal and frame delay before I trusted the file.
Picking the Right Output Format and a Pre-Sharing Checklist
GIF earns its keep for stickers, simple graphics, short loops, and places where every viewer needs to see the same thing. It wastes source quality on anything photographic. If the image depends on subtle color, clean gradients, or fine detail, choose JPG, WebP, or AVIF instead, as the HEIC to PNG format guide explains for related output choices.
Metadata does not survive this trip intact. HEIC often carries camera EXIF, GPS coordinates, depth data, and editing history, and GIF strips that baggage away. Live Photos also need their frames extracted first if you want motion at all. For a fuller note on HEIC metadata loss, see Apple’s HEIF documentation.
Before you share, do a quick check. Strip GPS from sensitive files. Verify orientation. Inspect the result at 100% zoom for banding, grain, or palette flicker. Test animation in two viewers if the file loops. That is the difference between a file that opens and a file that holds up.
If you want a tool that keeps the trade-off visible instead of hiding it, ConvertHEICto lets you control dithering, resizing, color handling, and privacy without sending photos to a server.