
The usual advice, keep HEIC for small files and convert to PNG for better quality, misses the most important detail: a larger PNG doesn’t recover anything the camera already discarded. It can also look different from the HEIC original, or preserve fewer camera features, even though PNG compression itself is lossless.
For a useful HEIC vs PNG comparison, look beyond the file extension. The deciding factors are what your software decodes, how it handles color, whether you’ll repeatedly re-save the image, and who needs to open the result.
Table of Contents
- HEIC vs PNG at a Glance
- Why HEIC Shrinks Photos and PNG Grows Them
- Transparency, Color and Metadata After Conversion
- How to Convert HEIC to PNG Without Losing Quality
- Browser Support and Web Publishing
- Choose the Right Format Before You Convert
HEIC vs PNG at a Glance
HEIC is the default photo format in the iPhone and iPad high-efficiency camera workflow, while PNG is the lossless graphics format used across the web. The right choice depends on what the image is for, not which format sounds more advanced.
HEIC and PNG compared on core criteria
| Criterion | HEIC | PNG |
|---|---|---|
| Standard | HEIF container standardized as ISO/IEC 23008-12, usually with HEVC inside | W3C Recommendation in 1996 |
| Compression | Lossy HEVC or lossless encoding, chosen by the capture or export workflow | Always lossless, using DEFLATE |
| Transparency | Supported through auxiliary alpha images | Full alpha channel |
| Color depth | Supports high-bit-depth workflows, including 10- or 12-bit imagery and wide gamuts such as Display P3 | Commonly 8 bits per channel in conventional workflows, not a format-wide ceiling |
| Re-saving | Lossy re-encoding can discard more detail; support in editors isn’t universal | Lossless re-saving preserves unchanged pixel values |
| Browser support | Limited native browser decoding; confirm the receiving browser | Broad support across mainstream browsers |
| Best use | Efficient camera-photo storage in compatible applications and devices | Screenshots, logos, interface assets, transparency, and exact edges |
The standards and compression distinctions matter here: the W3C PNG specification overview identifies PNG as a lossless format approved as a Recommendation in 1996, while Nokia’s HEIF technical documentation describes the HEIF container, HEVC compression, auxiliary images, and higher-bit-depth capabilities.
Capability isn’t the same as preservation
A format’s capabilities tell you what a file can contain. They don’t guarantee that your editor, converter, upload portal, or browser will preserve or display all of it.
That distinction is especially important with HEIC. A file may contain more than the visible photograph, while an application may expose only the main image. PNG gives you a comparatively straightforward raster image, but the export settings still determine which pixels and supporting information reach that file.
Short answer: Use PNG for screenshots, logos, and transparent graphics that need predictable rendering. Keep HEIC for camera photographs you store in a compatible Apple workflow.
Don’t interpret that recommendation as an instruction to convert an entire photo library. Make a delivery copy when another application needs one, and retain the camera original separately.
Also separate compression loss from editing changes. Saving an unchanged PNG doesn’t progressively damage its pixels, but resizing, flattening, color conversion, and retouching can change the image before it’s saved. A lossless file faithfully stores those changes, including changes you didn’t intend.
Why HEIC Shrinks Photos and PNG Grows Them
A HEIC photograph converted to PNG can come out several times larger without looking any better. JPEG conversion carries a smaller penalty, though its output size still swings with quality settings and image content.
In one published corpus experiment, median PNG outputs ran approximately 3.87× to 13.60× the size of their HEIC originals, compared with 1.75× to 4.65× for JPEG outputs, in the Cleanor storage-lab conversion preprint. Those are corpus- and encoder-dependent results, so read them as the scale of the difference rather than a prediction for your next export.
Size change when a HEIC photo is converted
| Output from a HEIC original | Size relative to HEIC | What drives the difference |
|---|---|---|
| HEIC original | Baseline | Capture settings and source encoding |
| JPEG conversion | About 1.75× to 4.65× | Quality setting and image content |
| PNG conversion | About 3.87× to 13.60× | Lossless storage retains decoded camera noise and detail |
Why photographs are expensive to store losslessly
PNG’s DEFLATE compression reorganizes image information without discarding any of it. That works well on graphics with repeated patterns, flat colors, and clean boundaries.
Camera photographs fight back. Fine foliage, fabric, hair, textured walls, and sensor noise create small pixel-to-pixel differences that a lossless encoder must store in full. It can’t judge that a patch of grain isn’t worth keeping.
HEIC usually wraps an HEVC-encoded image, often with lossy settings that discard exactly the kind of detail PNG would be forced to preserve. HEIF is the container and HEVC is the codec inside it, and confusing the two makes it easy to assume every HEIC file shares the same quality characteristics.
There’s a subtler consequence. Converting a lossy HEIC to PNG preserves the decoded photograph, not the scene before camera processing. Artifacts baked in by HEVC become ordinary pixels, and PNG then stores them faithfully at a much higher cost per pixel.
A bigger export can be a safer editing copy without being a better photograph.
Spend the extra storage where it helps
PNG’s popularity says nothing about photographic efficiency. Mighil’s analysis of image formats on the web put PNG usage on approximately 82% of websites in 2024, which measures adoption rather than suitability.
The increase earns its keep when you need a lossless working copy, transparency, or predictable interchange between graphics tools. It’s harder to justify for a finished holiday photo that only gets viewed or emailed.
If a submission portal insists on PNG, check its pixel dimensions first. Resize to the required dimensions before exporting, instead of producing a full-resolution PNG and then hunting through compression settings. Resizing removes pixels deliberately, so it isn’t a lossless operation, but it’s the single most effective lever when the destination doesn’t need full resolution.
Keep the full-resolution originals for future uses. A small delivery copy and an untouched source solve different problems.
Transparency, Color and Metadata After Conversion
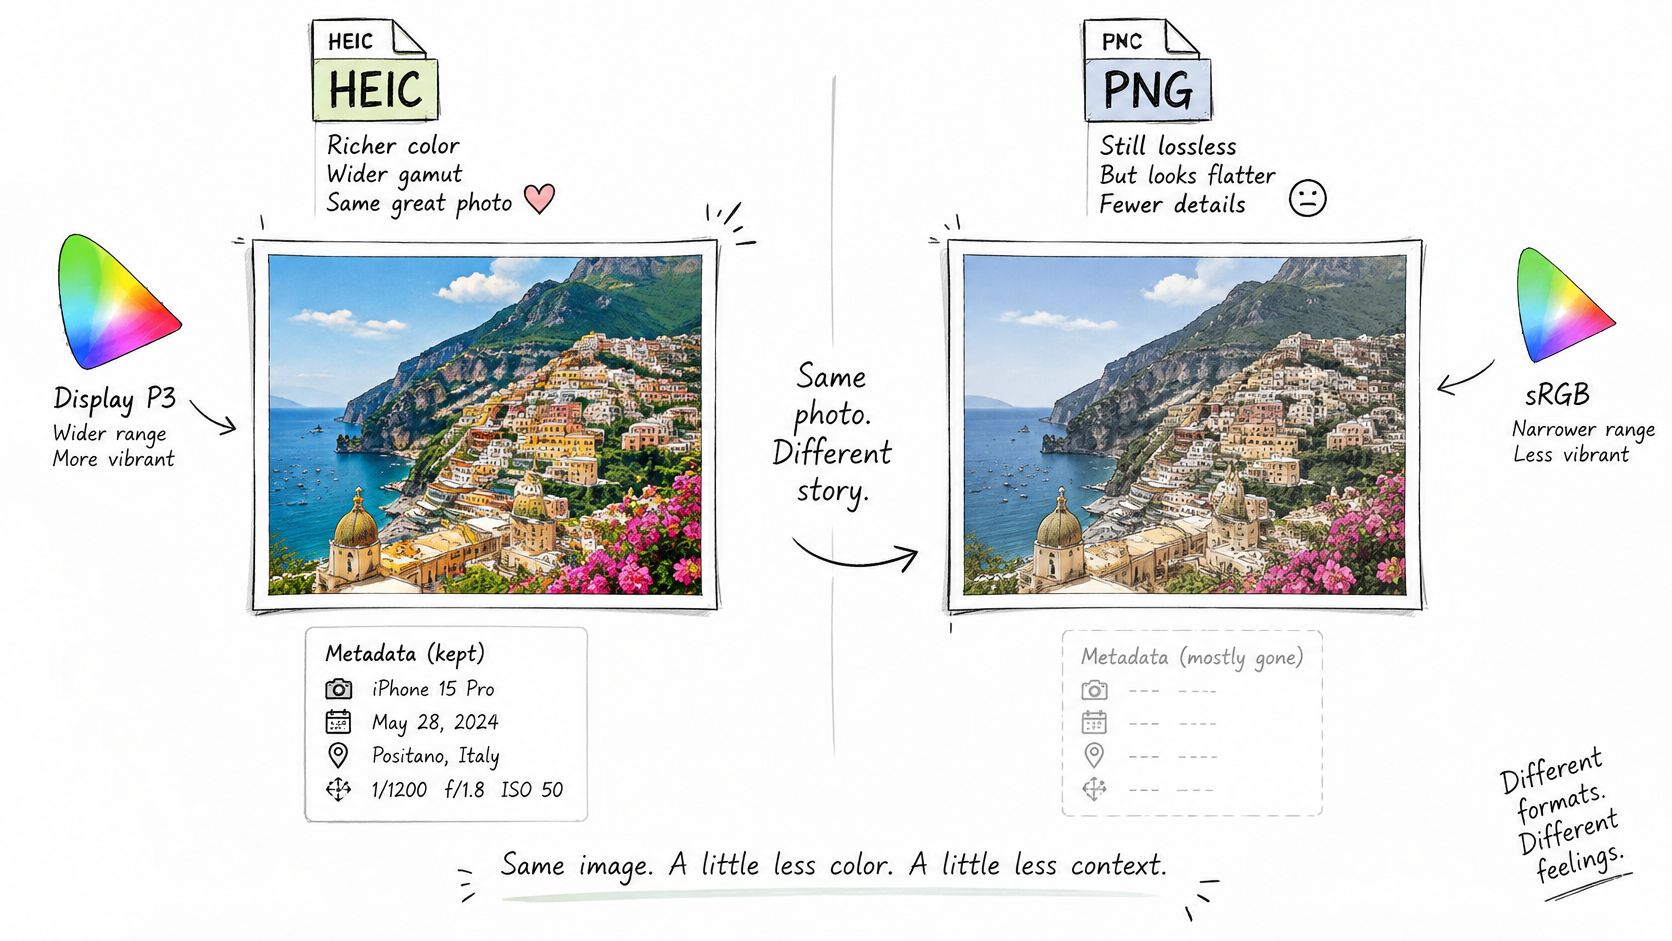
A lossless PNG can still look different from its HEIC original. PNG encoding preserves the pixels it receives, but decoding, color conversion, tone mapping, and orientation handling happen before those pixels are written.
ShortPixel’s HEIF workflow comparison highlights the practical problem: wide-gamut imagery and additional camera information don’t necessarily survive a conventional image-export pipeline unchanged. A Display P3 photograph moved into an sRGB-oriented workflow may look less saturated, while an HDR image may need a different rendering for an ordinary display.
Use the visual comparison as a checklist of attributes to inspect, rather than assuming the file extension guarantees preservation.
Check color and transparency in context
Say you’re exporting a Display P3 portrait for a client. Compare the original and exported image in a color-managed viewer, paying attention to skin tones, saturated clothing, and bright highlights. Don’t compare previews from unrelated applications and immediately blame PNG, because the viewers may interpret the profiles differently.
In our HEIC-to-PNG converter, the iPhone’s Display P3 profile is carried over, or colors are converted to sRGB for output formats that can’t store a profile. We also apply the rotation recorded by the iPhone before saving, so the exported photograph is upright.
Transparency needs its own inspection. HEIC can carry alpha information as an auxiliary image, but the decoder must read it for the PNG export to retain it. Exporting an ordinary opaque camera photo to PNG won’t create a transparent background.
For a transparent logo or cutout, inspect the result on both light and dark backgrounds. A white preview can hide missing transparency, pale fringes, or edge pixels that were previously blended against white.
Decide what metadata should leave with the image
A single-image PNG export isn’t a substitute for the entire HEIC package. Make deliberate choices about the supporting information:
- Capture details: Keep the date taken and camera information when they help organize or document the photograph.
- GPS location: Remove it unless the recipient needs the location and you intend to share it.
- Depth and related images: Retain the original if you may need portrait adjustments, auxiliary images, or image sequences later.
- Evidence and provenance: Preserve the untouched source separately rather than treating an export as the original record.
The sensible default is useful capture details retained, GPS removed, and color and orientation checked. For client work, inspect the actual downloaded file, not just the converter preview.
How to Convert HEIC to PNG Without Losing Quality
A careful conversion avoids additional lossy compression, but it can’t guarantee that every camera-side feature will fit into a single PNG. Treat the objective as preserving the required appearance and decoded image detail while keeping the source available.
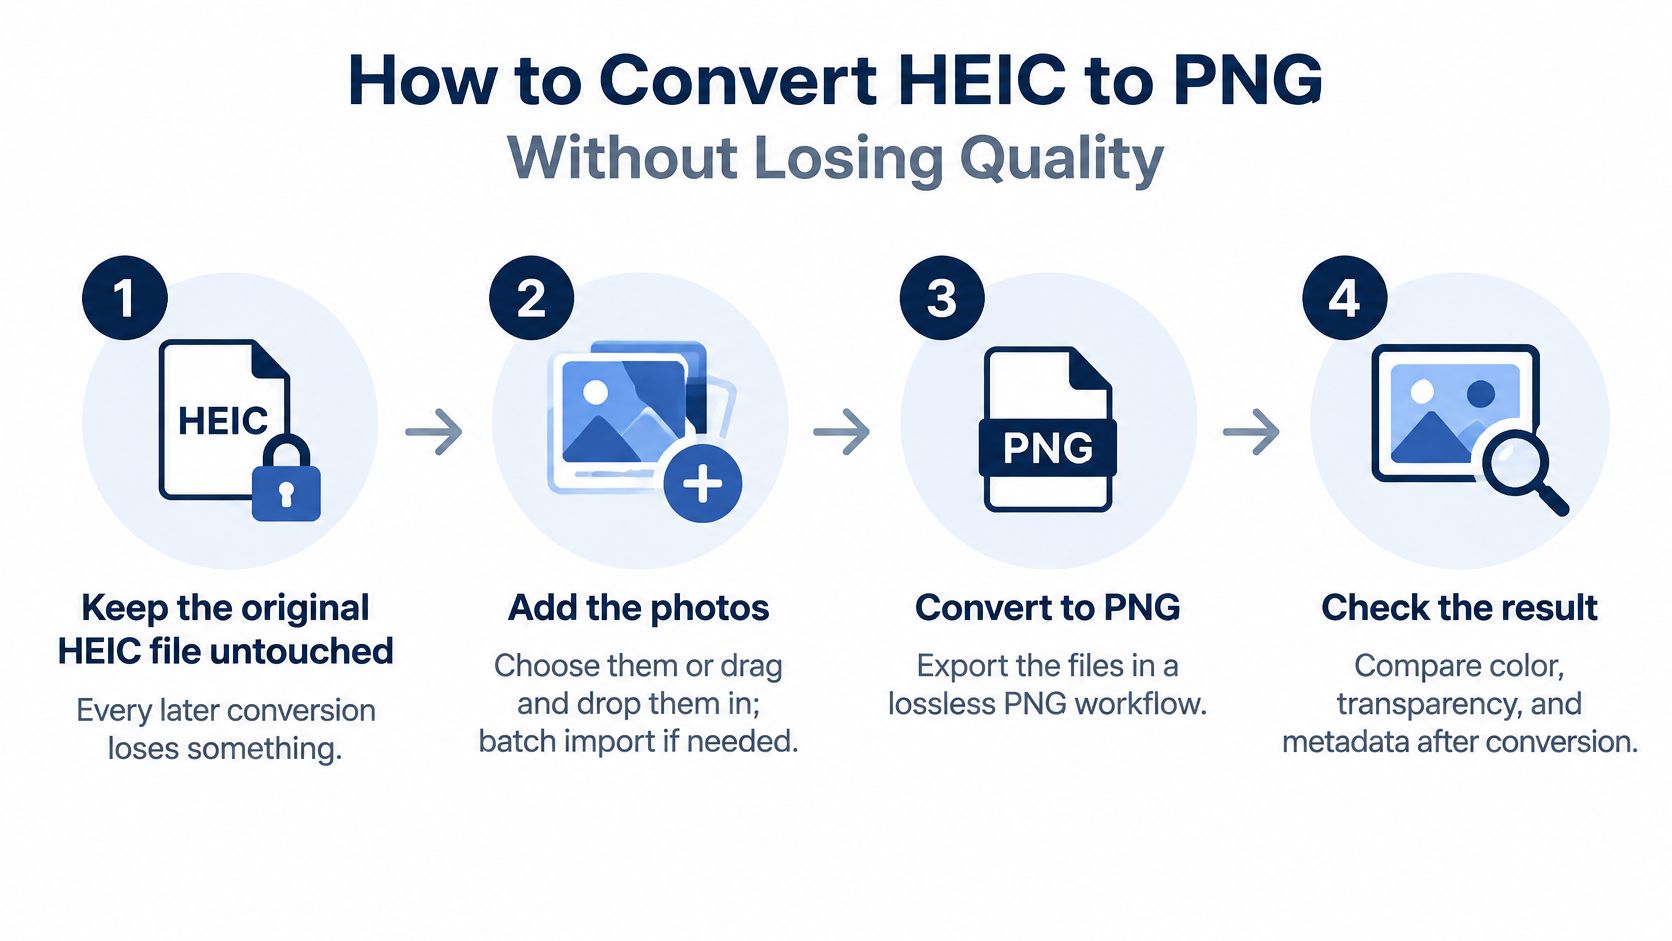
This workflow keeps the original separate from the export and makes inspection part of the conversion.
Set up the export deliberately
-
Keep the original HEIC untouched. Save the PNG as a separate file rather than replacing the source. A conversion may preserve the main image while omitting information you’ll want later.
-
Add the photographs. Choose HEIC or HEIF files through the file picker, or drag and drop them into the converter. Batch conversion is useful for a folder of related images, but test a representative photo before processing everything.
-
Select PNG output and lossless compression. Our compression controls offer LZW for smaller lossless files or None for maximum compatibility. Treat these as interface labels, not a description of PNG’s underlying codec, because standard PNG uses DEFLATE rather than LZW.
-
Set a maximum edge only when needed. Our size options include 2048 px, which is useful if that matches an upload requirement; otherwise, keep original size. Resizing reduces detail, so don’t enable it merely because a smaller option is available.
-
Use dithering selectively. If the workflow exposes dithering, enable it when smooth gradients, such as skies or studio backgrounds, show banding. It can smooth tonal transitions but produces a slightly larger file, so it isn’t a necessary setting for every image.
-
Inspect the preview. Confirm that the photograph is upright, colors look appropriate, and transparent edges remain clean. A flatter appearance calls for checking the color-profile handling, not just increasing the file size.
-
Download and reopen the result. Save individual files or download the batch as a ZIP archive. Open a downloaded PNG in the application that will use it, because a successful preview doesn’t prove that the receiving workflow handles it correctly.
Avoid unnecessary re-encoding
The common mistake is creating a PNG, converting that copy to JPEG, then later converting the JPEG back to PNG. The final PNG can’t undo the JPEG compression introduced along the way.
Export each delivery format from the original or a retained lossless working master. If you need a JPEG for email and a PNG for design work, create separate outputs instead of using one delivery file as the source for the other.
An unchanged PNG can be re-saved losslessly. What you should avoid is repeatedly sending the image through lossy encoders or applying unnecessary resizing and profile conversions.
For a visual walkthrough, use the conversion demonstration below.
A correct result is upright, has the intended dimensions, matches the expected colors, and shows no objectionable banding in smooth gradients. If any of those checks fail, revisit the export settings before converting the rest of the batch.
Browser Support and Web Publishing
A HEIC file can be perfectly valid and still show a broken-image icon to most of your audience. The reason sits in the browser: every visitor’s browser must decode the image itself, and support there is much narrower than in operating systems or photo apps.
Can I Use’s HEIF compatibility table lists HEIC as unsupported in Chrome, Firefox, Edge, and Opera, with Safari support beginning at version 17 and reported global usage coverage of about 16.93%. That snapshot will shift as releases roll out, but it settles one point: testing an image only in your own photo viewer, or only in Safari, is an incomplete publishing check.
PNG clears the decoding hurdle in every browser, which is why it stays the safe delivery default. Safe and efficient are separate requirements, though, and a large PNG of a photograph usually satisfies only the first.
Match the output to the content
For screenshots, diagrams, logos, and interface assets, PNG renders dependably and keeps text and fine edges clean. A photograph gains nothing from lossless delivery, so WebP or AVIF is the better choice there, with a JPEG fallback where the workflow needs one.
A repair blog post makes the split concrete:
- PNG for the annotated wiring diagram: small labels and hard boundaries stay sharp.
- WebP or JPEG for the photo of the finished installation: the image only needs to illustrate the work.
- Check the published page, not the upload: a content management system may recompress or resize the file you uploaded.
Web delivery is where WebP earns its place. The HEIC to WebP conversion guide covers that path when the goal is a small photographic file rather than an editing master.
Separate upload acceptance from visitor rendering
A site can accept a HEIC upload and still serve visitors something else entirely. Three outcomes are common: the platform converts the file before delivery, it rejects the upload, or it stores the HEIC and serves it unchanged to browsers that cannot decode it. Only the first two announce themselves at upload time, so inspect the public page in a second browser before calling the job done.
Color is the quieter failure. A browser may decode the file yet render it with shifted tones if the platform strips the embedded profile during processing. Display P3 photos are the usual casualty, so convert to sRGB before publishing or confirm the pipeline preserves the profile.
Test what visitors receive, not just what your computer can open.
Choose the output for the image content, the site’s delivery pipeline, and the browsers your visitors use.
Choose the Right Format Before You Convert
Choose by the job, then choose the format. Start with the destination’s requirements and the recipient’s software, rather than converting everything to whichever extension seems safest.
The situations below separate keeping a source photograph from producing a useful delivery copy.
Format to choose by situation
| Situation | Choose | Why |
|---|---|---|
| iPhone photos you want to keep at full quality | Keep the HEIC original | Retains the captured file and its associated information without an unnecessary export |
| Photo to send to a Windows PC or Android phone | JPG | A practical, broadly compatible delivery format |
| Screenshot, logo, or interface asset | PNG | Lossless pixels, transparency, and clean edges |
| Photo for a blog or website | WebP or AVIF, with JPG as fallback | Efficient photographic delivery with a compatibility fallback |
| Print, publishing, or archive | TIFF or lossless PNG | Lossless raster output when accepted by the receiving workflow |
If your situation doesn’t fit neatly into a row, answer two questions: Who will open the file, and what will they do with it? A recipient who only needs to view a photograph doesn’t need the same file as a designer building a composite or a printer preparing a publication.
For ordinary photo sharing, the HEIC vs JPG comparison addresses a more useful choice than automatically exporting PNG. Don’t impose a large lossless file on someone who only needs a convenient viewing copy.
Keep an original and a purpose-built copy
For editing, retain the camera original and create the working format your application needs. PNG is useful for flattened raster work, but it doesn’t preserve editable layers or replace a project file from an application such as Photoshop.
For print, ask for the printer’s required format, dimensions, and color workflow before exporting. A lossless file isn’t automatically print-ready, and converting to PNG doesn’t fix insufficient resolution or an unsuitable color conversion.
For an archive, keep the original alongside any normalized copy. Give the files clear names so a delivery version doesn’t later get mistaken for the untouched source.
Make the final check practical
Conversion location matters when photographs include family members, private interiors, or documentation. We process photos inside your browser on your own device, with no upload step and no server retaining a copy.
You can add as many iPhone photos as you like, choose an output format, and download the results. For a large set, start with examples that include saturated colors, smooth gradients, and any transparency you need preserved, then apply the settings that pass inspection.
The useful action today is simple: pick one image you need to send or publish, confirm the destination’s requirements, and export a copy for that job. Open that copy at the destination before treating the conversion as finished.
ConvertHEICto converts HEIC and HEIF photos into PNG, JPG, WebP, and other useful formats directly on your device, without uploading your pictures. Visit ConvertHEICto, choose the format your destination needs, and check the exported color, orientation, and dimensions before sharing.