
You’ve found the exact chorus you want, copied the song to your iPhone, and changed the ending from .mp3 to .m4r. The file still plays, so it looks like it worked. Then you open Settings and the ringtone isn’t there.
That failure is normal, and it’s fixable. To Convert MP3 to M4R correctly, you need three separate changes, not one rename. You must shorten the song, re-encode the sound itself, and then install the result through GarageBand. Skipping any of those steps leaves you with a file that works on a computer but stays invisible on the phone where it matters.
Table of Contents
- What an iPhone M4R File Must Be
- Bitrate and Length Choices That Sound Right
- How to Convert the MP3 Clip to M4R
- How to Install the Ringtone with GarageBand
- When the Ringtone Still Will Not Appear
- Set the Clip as Your iPhone Ringtone
What an iPhone M4R File Must Be
Renaming a file doesn’t change what’s inside it. If song.mp3 becomes song.m4r, the audio is still MP3 audio with a misleading name, and iOS spots that right away. That’s why the renamed file still fails on the phone even though a desktop player opens it without complaint.
An M4R file is different in two ways. First, the sound inside is AAC-LC audio, not MP3. Second, that audio sits in an MPEG-4 container with the .m4r extension, which tells iOS the file is a ringtone rather than an ordinary M4A song file.
The Four Requirements
According to the FileFormat.com M4R format documentation, duration is the defining constraint, with a maximum of 40 seconds in older format notes, and a typical full-length MP3 song may run 3 to 5 minutes. Every file you make needs to meet all four targets in this table.
| Requirement | Target | Why it matters |
|---|---|---|
| Duration | 30 seconds or less | GarageBand ringtone export stops at 30 seconds; older notes cite 40 seconds |
| Codec | AAC-LC | M4R is AAC audio, not an MP3 renamed to .m4r |
| Container | MPEG-4 saved as .m4r | A raw .aac file is not treated as a ringtone |
| Channels | Stereo for music, mono for voice | Mono is enough for alerts and keeps the file smaller |
Notice the two duration figures. Older format notes allow up to 40 seconds, but GarageBand’s current ringtone export stops at 30 seconds. A clip kept under 30 seconds satisfies both limits, so treat 30 seconds as your working limit from the start.
Working limit: Cut to 30 seconds or less and you never have to guess which rule your phone will enforce.
Why Duration Rejects Most Attempts
A full song can’t be a ringtone as it stands. You have to pick one short excerpt with a clear start and end point, and only that excerpt gets encoded. Duration is the rule that rejects most first attempts, because people select a start point and forget to set an end point.
There’s one more quality point to understand before you start. MP3 is already a lossy format, which means some sound detail was discarded when the MP3 was made. Encoding to AAC compresses it again, so each conversion adds a little more loss. Starting from the highest quality MP3 you have keeps that damage to a minimum.
A raw .aac file won’t work either, since iOS doesn’t treat a bare AAC stream as a ringtone. The audio needs the MPEG-4 container and the .m4r name together.
Before you open any tool, listen to your song once and write down the start and end times of the excerpt you want. Those two numbers drive everything that follows.
Bitrate and Length Choices That Sound Right
Bitrate controls how much data describes each second of sound. Higher isn’t automatically better. You’re listening through a small phone speaker, often in a noisy room, so you should pick a bitrate based on your source and that speaker, not the largest number in the encoder menu.
You can predict the file size before you encode. The math is simple: bitrate multiplied by duration divided by eight. The XConvert M4R technical guidance puts 128 kbps at about 480 KB for 30 seconds and 256 kbps at about 960 KB, which gives you a reliable way to check any other setting.
| Bitrate | Best for | About this size | Trade-off |
|---|---|---|---|
| 96 kbps | Speech and simple alerts | About 360 KB | Smaller, fine for voice, thin for music |
| 128 kbps | Music ringtones | About 480 KB | Default; sensible on a phone speaker |
| 192 kbps | Optional music | About 720 KB | Larger with little audible gain |
| 256 kbps | High-bitrate sources only | About 960 KB | Size rises; phone speaker rarely shows the difference |
Picking Your Number
- 128 kbps for music: This is the default to keep for a song chorus, since it sounds clean through a phone speaker at about 480 KB.
- 96 kbps for voice: Speech and simple alert tones stay clear at about 360 KB, but music starts to sound thin at this setting.
- 192 kbps optional: At about 720 KB the file grows without a reliable improvement you’d hear.
- 256 kbps rarely needed: Reserve this for high-bitrate sources, since the speaker can’t reveal the extra detail.
Here’s the trap many people fall into. Encoding a low-bitrate MP3 at a high AAC bitrate can’t restore detail the MP3 already threw away. If your source is a 96 kbps MP3 and you encode it at 256 kbps, you get a file that’s bigger and sounds exactly the same. Matching or slightly exceeding your source quality is the sensible ceiling.
If you’re also sorting out other audio conversions from editing projects, our guide to converting AUP projects to MP3 covers a related export workflow.
Stereo, Mono and One-Pass Encoding
Keep stereo for music when the width of the recording matters, like a guitar panned to one side. Switch to mono for voice memos and notification sounds, where a single channel is plenty and the file stays smaller.
Trim and encode in a single pass. Exporting an intermediate file, then converting it again, stacks one lossy pass on top of another and dulls the sound each time. Do the cut and the AAC encode together, once.
Use the size math as a sanity check afterward. If your 30-second clip at 128 kbps lands far from 480 KB, something’s off. Check the duration, confirm the bitrate mode didn’t change, and look for embedded cover art padding the file.
The judgment is simple. Start at 128 kbps stereo for a song chorus. Drop to 96 kbps mono only for speech alerts.
How to Convert the MP3 Clip to M4R
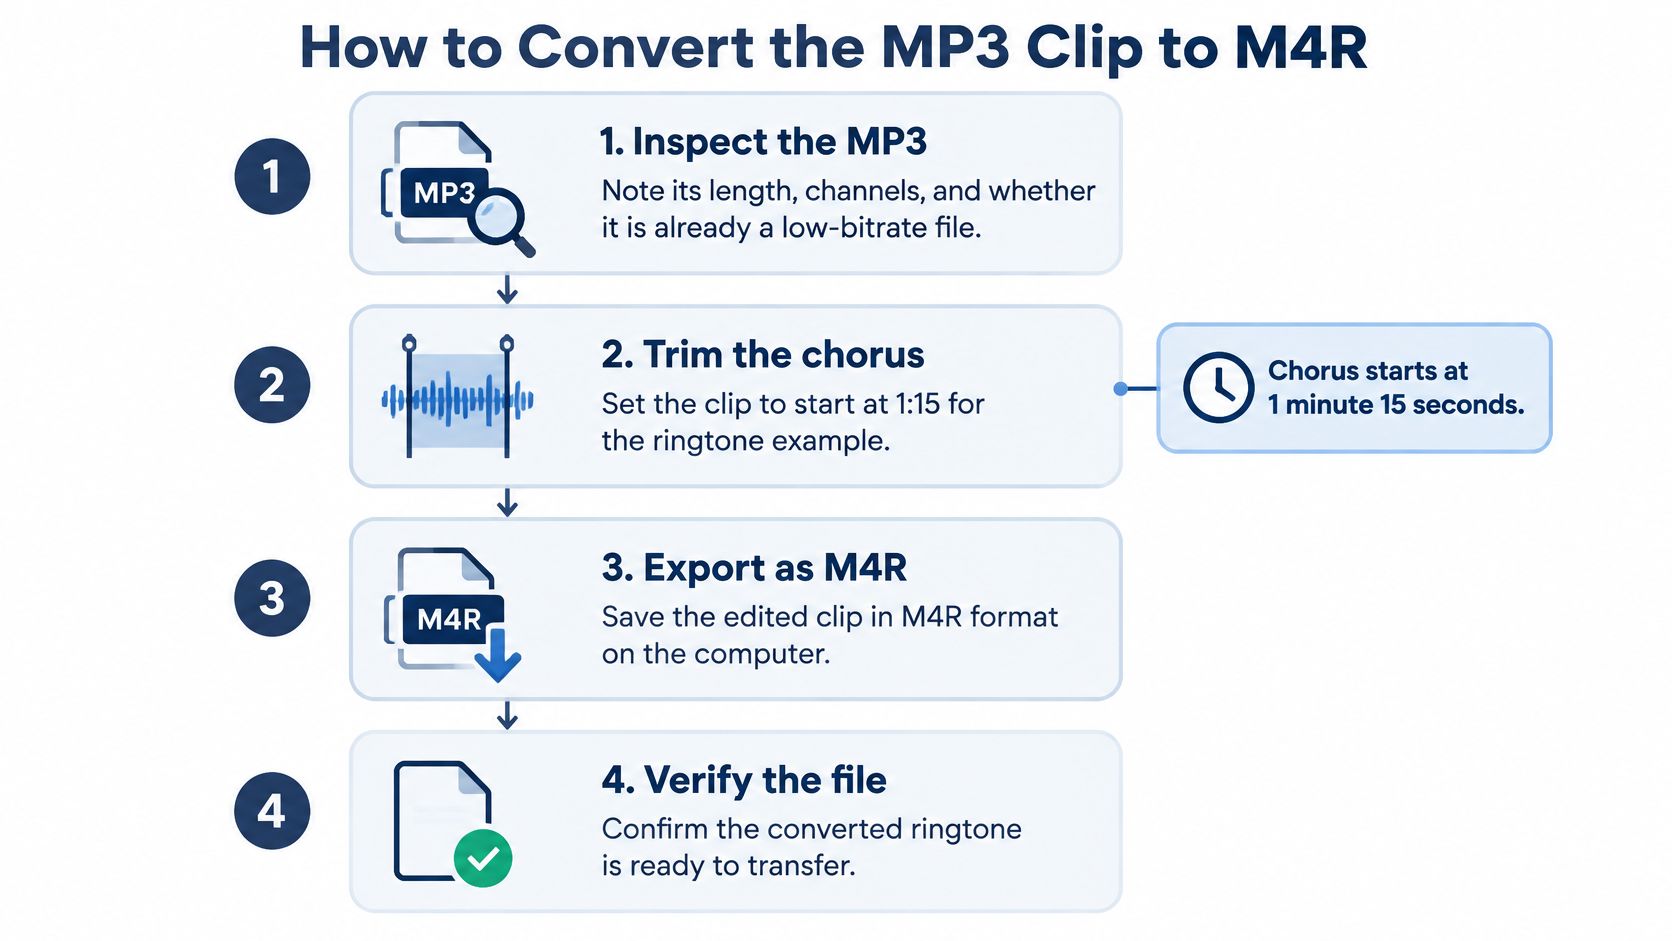
Take a concrete example: a chorus that starts at 1 minute 15 seconds into the song. The work happens on a computer, and the same steps apply to any start point you noted while listening.
The diagram below shows the workflow stages in order before each step is walked through.
The Five Steps
- Inspect the MP3: Open the file and note its length, its channel count, and whether it’s already a low-bitrate file that limits your options.
- Choose the start point by listening: Play the song and confirm the chorus really begins at 1:15, rather than guessing from a filename or waveform.
- Trim to 30 seconds or less: Cut in the same pass as the encode, so there’s no intermediate MP3 or M4A file to convert a second time.
- Encode as AAC-LC at 128 kbps: Put the audio in an MPEG-4 container and save it as ringtone.m4r.
- Verify before transferring: Reopen the output in a media inspector and check it against the requirements table.
For step four, the FFmpeg documentation on supported formats and codecs confirms AAC encoding support, and one representative command does the whole job:
ffmpeg -i input.mp3 -ss 00:01:15 -t 30 -c:a aac -b:a 128k -f ipod ringtone.m4r
What Each Flag Does
Each part of that command has one job. The -ss flag sets the start offset, -t 30 sets the length, -c:a aac selects AAC encoding, and -b:a 128k sets the bitrate. The -f ipod flag matters most, because it forces the MPEG-4 ringtone container instead of a bare AAC stream that iOS would ignore.
This last point explains why the rename shortcut fails. Changing input.mp3 to input.m4r edits only the filename, while the audio inside stays MP3 and the wrapper stays whatever it was. iOS checks the container and codec, not the extension, so a renamed file never reaches the ringtone list. The -c:a aac and -f ipod flags together are what rebuild the file into the form the phone accepts.
A graphical trimmer is fine as long as it performs the same trim, the same AAC-LC encode, and the same .m4r save in one export.
Run the command and you get a file called ringtone.m4r in the same folder. The whole transformation is reproducible, so if the start point feels half a second early, you adjust the -ss value and run it again rather than re-importing anything.
Watch how the finished file should behave when it’s inspected and played.
Verify the Output
Open ringtone.m4r in a media inspector and confirm five things: an MPEG-4 container, an AAC audio stream, a duration at or under 30 seconds, the channel count you expected, and a size near 480 KB before tags or artwork. If all five match, the file is ready to move to your phone.
This one command prevents the three most common failures. It stops you leaving MP3 audio unchanged under an .m4r name, it can’t produce a clip longer than 30 seconds because -t caps it, and it can’t output raw AAC because -f ipod forces the container.
A verified file is still only half the job. iOS lists a tone under Ringtones only after GarageBand imports and exports it on the phone, and that export enforces the same 30-second limit the -t flag already respects here.
How to Install the Ringtone with GarageBand
Here’s the gap that catches almost everyone. You can make a technically perfect M4R file and still not find it under Ringtone in Settings. Conversion makes the file, but conversion never installs it.
Think of this as two separate jobs. The computer makes the AAC clip. GarageBand is what places that clip into the iPhone’s ringtone list. Finishing only the first job leaves the file sitting in a folder where iOS doesn’t look for ringtones.
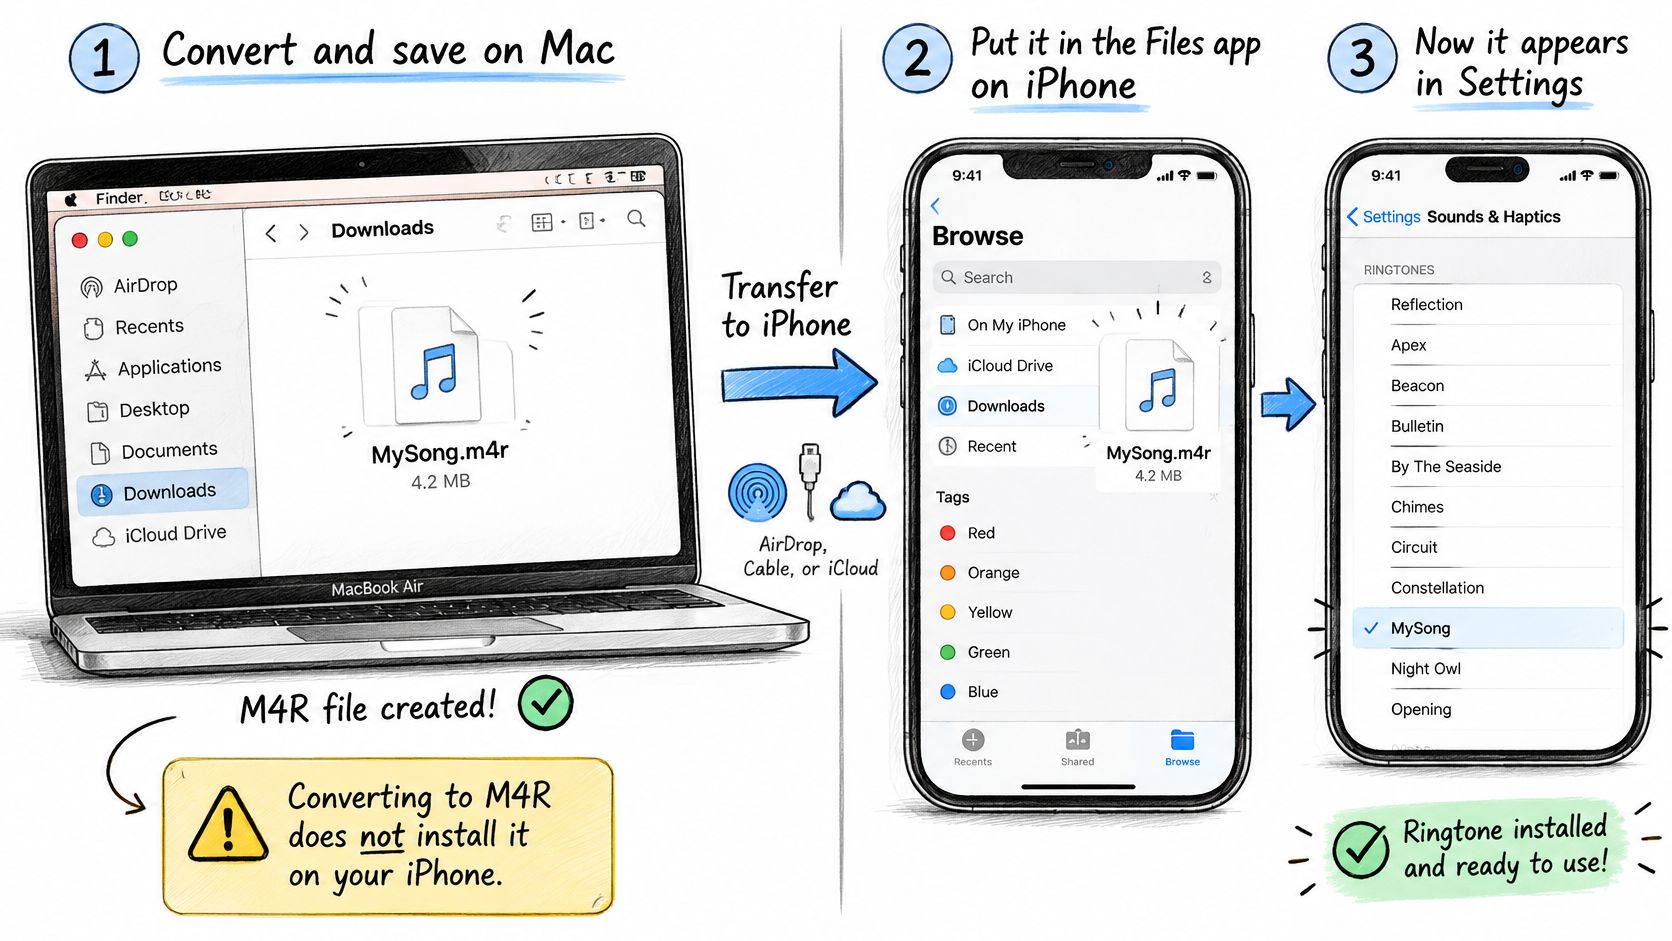
The walkthrough below shows where the file needs to travel before it becomes selectable.
The iPhone Path
According to Apple’s GarageBand ringtone instructions, exported ringtones can be no longer than 30 seconds, and GarageBand can shorten an overlong file during export. Work through these steps in order:
- Save the file in Files: Make sure ringtone.m4r is stored locally in the Files app on your iPhone, not only in cloud storage.
- Open GarageBand and import: Create a project and bring the audio in from Files.
- Open Share: Use the share option for the project rather than exporting a song.
- Choose Ringtone: Select the ringtone export option and give the tone a name you’ll recognize.
- Export it: Let GarageBand finish the export so iOS registers the clip as a ringtone.
The Computer-to-Phone Path
Say your chorus is finished and verified on a laptop. Copy ringtone.m4r onto the iPhone by AirDrop or a cable transfer so it lands in the Files app. That transfer alone still doesn’t install anything.
From there, run the exact same GarageBand steps: import from Files, open Share, choose Ringtone, and export. Only after that export does the new name show up in the ringtone list. Don’t stop when the file merely sits in Files or appears in a music library, because neither location counts as installation.
The distinction to remember: A file sitting in Files is stored. A file exported through GarageBand as a ringtone is installed.
Confirm and Check Eligibility
After export, open Settings, Sounds and Haptics, Ringtone and look for the name you gave it. Finding it there proves both halves of the job are done. If it’s missing, the export step is the first thing to recheck.
One limit has nothing to do with format at all. Music protected by usage restrictions may not be eligible for ringtone creation, so a purchased or streamed file with DRM can fail even when every step is right. No converter setting fixes that, and you’ll need an unprotected file you own instead.
If your only device is an iPhone, be aware the AAC-LC encode from the computer workflow can’t run on it in the same way. Make the clip on a computer first, move it into Files, and then begin the GarageBand steps.
When the Ringtone Still Will Not Appear
Start with the symptom you’re seeing and match it to one cause and one fix. Work from the top of the table, because the first row explains the largest share of failed attempts. Change one thing, then recheck before trying the next.
That top case is the missing ringtone. The file plays perfectly on your computer, yet Settings shows nothing new. In almost every case the file was never exported from GarageBand using Share and Ringtone, so iOS never registered it.
| Symptom | Usual cause | Fix |
|---|---|---|
| Not listed under Ringtone | File never exported from GarageBand | Import in GarageBand, then Share and Ringtone |
| Still identified as MP3 | Extension renamed only | Encode AAC-LC in an MPEG-4 .m4r |
| Export blocked or shortened | Longer than 30 seconds | Trim to 30 seconds or shorten in GarageBand |
| AAC but not a ringtone | Raw AAC instead of MPEG-4 | Re-export as MPEG-4 with .m4r |
| Import refused | DRM or usage restrictions | Use an unprotected personal file |
| Much larger than expected | Long duration or embedded art | Confirm 30 seconds and remove artwork |
Reading the Other Symptoms
If players still identify your file as MP3 despite the .m4r ending, only the name changed. Re-encode the audio as AAC-LC inside an MPEG-4 container and save it again. The extension alone never converts anything.
If GarageBand refuses the export or cuts the ending off, your excerpt runs past 30 seconds. Recut it at the intended start point with the length capped, rather than letting the export chop wherever it lands.
If a media inspector shows AAC but no MPEG-4 container, you exported raw AAC. Re-export with the MPEG-4 container forced and the .m4r name applied, then check the inspector again.
Sound and Size Problems
A ringtone that sounds worse than its source was usually converted more than once, or a low-bitrate MP3 was pushed to a higher AAC bitrate expecting improvement. Go back to the original MP3 and do one clean encode.
Size tells a similar story. A clip that’s supposed to run half a minute but weighs several megabytes has the wrong duration or carries embedded artwork. Confirm the length and strip the artwork before re-exporting.
An import refusal tied to usage restrictions isn’t a format fault, so no re-export fixes it. Use a personal unprotected file instead of a streamed copy.
After each fix, reopen the file in an inspector and confirm container, codec, and duration before transferring it again. That thirty-second check saves a full repeat of the GarageBand steps.
Set the Clip as Your iPhone Ringtone
Do one final check before assigning anything. Reopen the finished file and compare it against the four requirements: 30 seconds or less, AAC-LC, MPEG-4 saved as .m4r, and the right channels for the sound. Move on only when all four pass. A failure sends you back to the single encode step, not to another rename.
Copy the passing file into Files on your iPhone, export it through GarageBand with Share and Ringtone, then open Settings, Sounds and Haptics, Ringtone, and tap the new name. A short mono version of the same clip can also serve as a text tone.
Two reminders protect your result. A protected stream is the wrong source no matter how clean your settings are, and another lossy save won’t improve a thin MP3.
Finish with this rule. If GarageBand exports your clip without shortening it, set it and stop. If GarageBand has to shorten it, the excerpt was too long, so recut it at your intended start point and export once more.
When iPhone photos cause the same kind of compatibility headache as audio files do, ConvertHEICto converts HEIC and HEIF images to JPG, PNG, WebP, and other widely supported formats right in your browser. It works on iPhone and iPad in Safari as well as on desktop, it’s free to use, and converted files can be downloaded all at once as a ZIP file.