
You’ve filled in the whole application, you tap upload, you choose a clear photo of your ID from your iPhone, and the form rejects it. The file name ends in .heic, and the site wants JPG. You’re not doing anything wrong. Your phone is saving space in a format that portal can’t read, and learning how to change iPhone photos to JPG is really about making one small choice first.
Table of Contents
- Why Your iPhone Photos Arrive as HEIC
- Choose a JPG Method for the Photos You Need
- Set Future iPhone Photos to JPG
- Export Existing iPhone Photos as JPG
- Keep Quality and Details When You Convert
- Convert Only the Photos a Recipient Needs
Why Your iPhone Photos Arrive as HEIC
A school portal asks for a photo of a birth certificate. You take the picture, attach it, and get an error. A Windows laptop at work shows a blank icon, or an email program cannot preview the file. Your iPhone displays it because it understands HEIC.
HEIC is a common file extension for images saved in the HEIF format. When the iPhone camera is set to High Efficiency, it saves new photos as HEIC. This format keeps image quality similar to JPEG while using less storage.
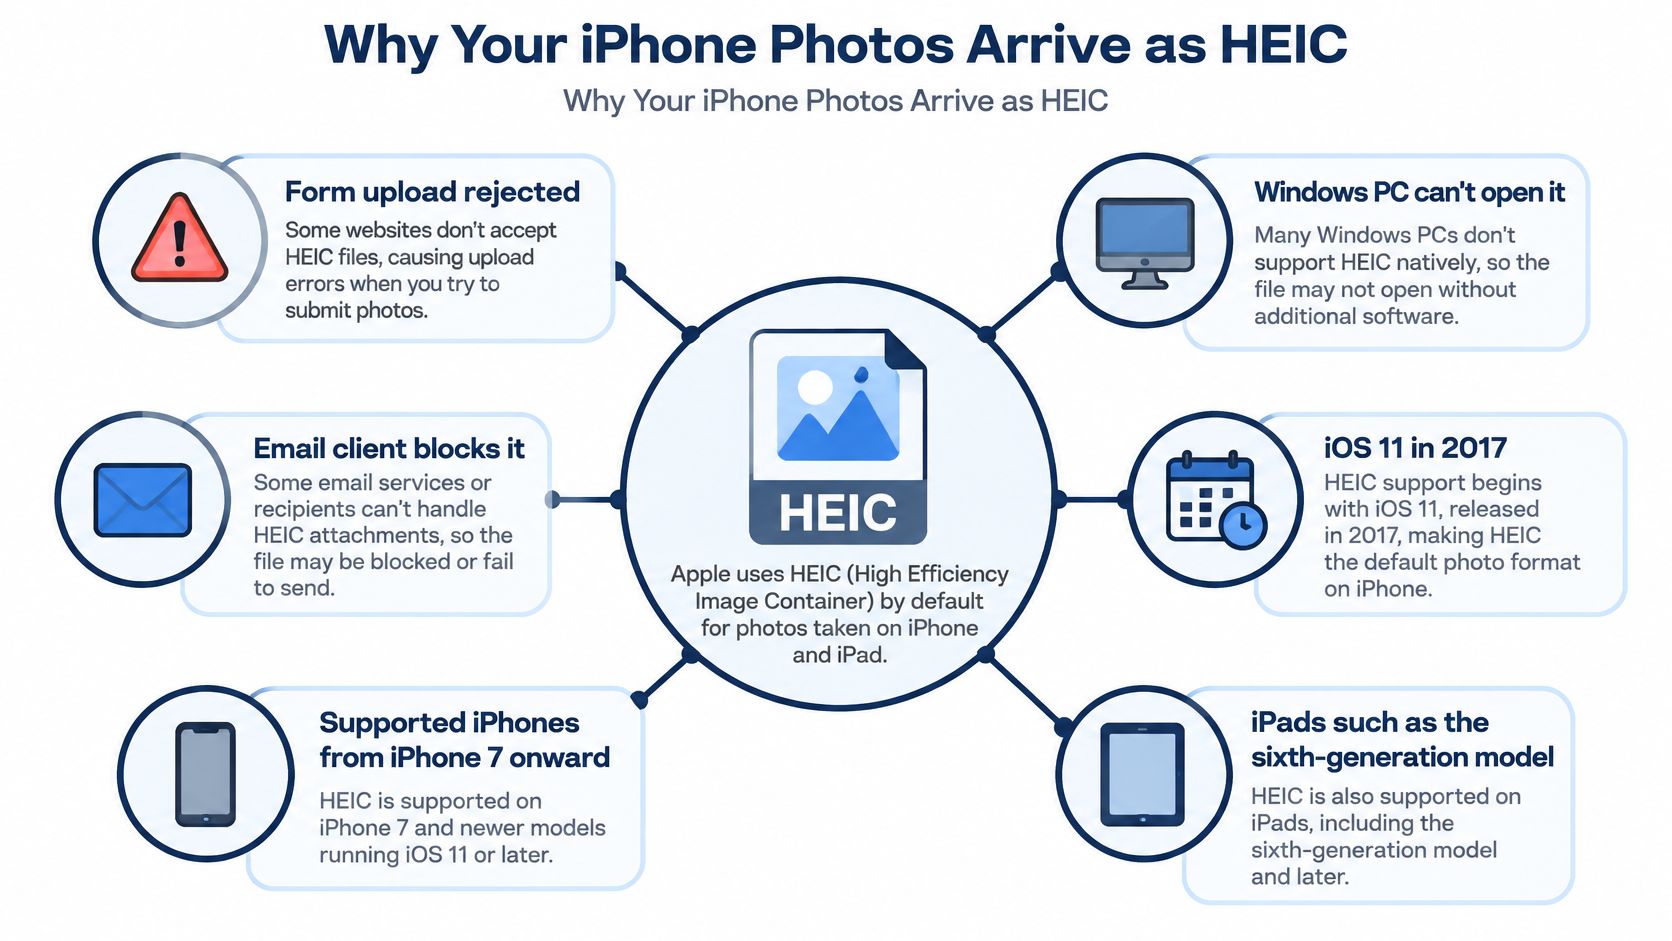
JPG is the shorter name people often use for JPEG. Websites, office apps, printers, and older computers widely support it, which is why forms often request JPG.
Changing the camera setting affects new photos only. It does not rewrite pictures already in your library. Apple explains that selecting Most Compatible saves new photos as JPEG, while existing HEIC photos need to be exported or converted separately in its instructions for HEIF and HEVC formats. For more on why iPhones use this format, see why your photos are HEIC.
Choose a JPG Method for the Photos You Need
For a one-off upload, convert only the photos the form or person requires and leave your camera alone. This is the suggested approach. The other methods are helpful, but each converts a different set of files, and choosing the wrong one is why a photo sometimes remains HEIC after you’ve “fixed” it.
Which JPG Route Matches the Photos You Have
| Method | What becomes JPG | Use it when | Existing library |
|---|---|---|---|
| Most Compatible in Camera Formats | New photos taken after the change | You want every future shot as JPEG | Stays HEIC until exported |
| Share sheet or Save to Files | The photos you select | Email, a form, or a few attachments | Stays HEIC on the iPhone |
| Transfer set to Automatic | Copies sent to a Mac or PC | Importing through Photos, Image Capture, or a PC | Originals stay HEIC if not deleted |
| Transfer set to Keep Originals | Nothing; HEIC is preserved | You need the original HEIC on the computer | Unchanged |
| Download from iCloud Photos | Usually the original HEIC | You want the full-resolution original | Not a dependable JPG step |
| In-browser HEIC converter | Files you add, one or a batch | Private batch JPG with a chosen quality | Originals stay unless you delete them |
Two rows catch people out. Keep Originals does exactly what it says, so a transfer with that setting arrives as HEIC on purpose. And downloading an original from iCloud Photos gives you the full-resolution original file, which is usually HEIC, so that download by itself isn’t a conversion.
What the Permanent Switch Costs in Space
The trade for switching every future photo to JPG is storage. Based on DB Labs’ 2026 estimates for how many photos an iPhone can hold, a 128 GB iPhone can store approximately 30,000 to 50,000 HEIC photos or 15,000 to 25,000 JPEG photos. That’s roughly twice as many pictures in the smaller format.
The same gap shows up file by file. According to CompanionLink’s 2024 guidance, HEIF files use approximately 50% less storage than JPEG files at comparable quality. An iPhone photo saved as HEIF typically occupies about 2 MB on older 12-megapixel models, according to DB Labs’ 2026 storage analysis, so a large library converted for no reason grows fast.
Pick your route from the table, then follow only the matching steps. If a recipient needs three photos, you need three JPGs, not a new camera habit.
Set Future iPhone Photos to JPG
Use this setting when you want every photo from now on saved as JPG, for example if you upload to the same older work system every day. It takes less than a minute.
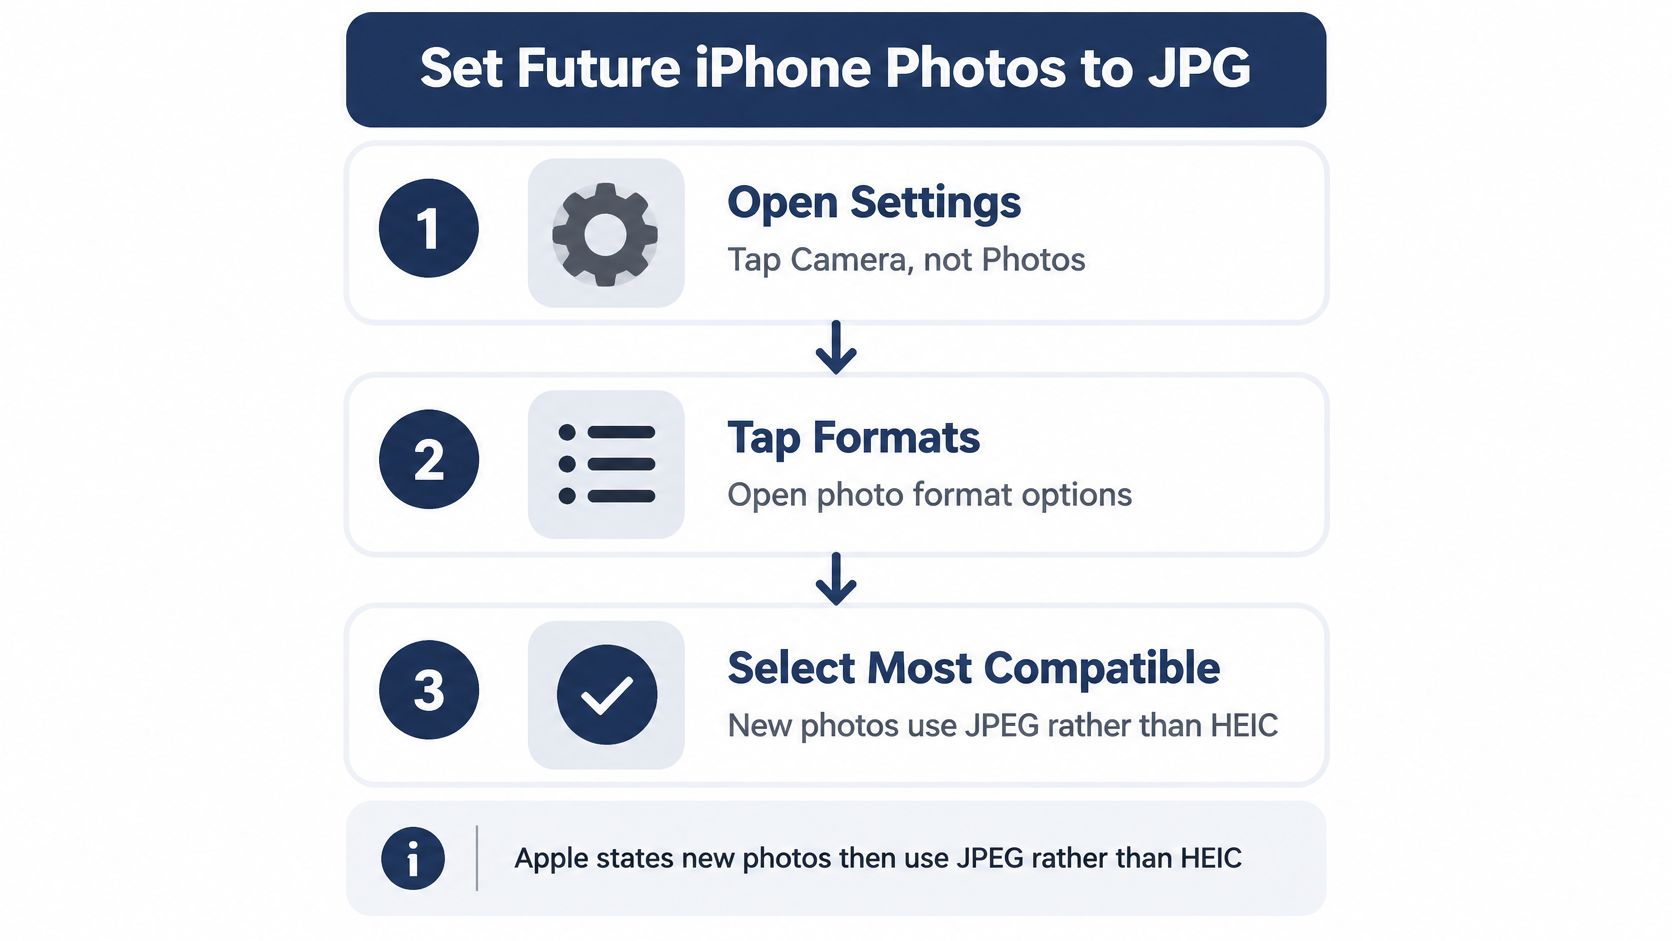
- Open Settings and tap Camera. It’s under Camera, not Photos, which is where many users look first.
- Tap Formats. You’ll see two choices for how the camera captures new files.
- Select Most Compatible. From that moment, new photos save as JPEG.
- Take one test photo. Share or transfer it and check that the file name ends in .jpg or .jpeg.
- Leave Settings. There’s no save button. The choice is already active.
Now the warning that belongs right after that last tap. Photos you took before this change stay HEIC. The setting controls the camera going forward. It doesn’t go back through your library and rewrite anything, so an old photo attached from Photos may still arrive as HEIC depending on how you send it.
Which Devices Show the Formats Option
Apple’s support page on HEIF and HEVC formats states that all new photos will use JPEG rather than HEIF after you select Most Compatible, and it lists support including iPhone 7 and iPhone 7 Plus or later, plus iPads such as the sixth-generation iPad and later. The other option, High Efficiency, keeps photos in HEIF, the format Apple introduced with iOS 11 and macOS High Sierra in 2017.
If you don’t see Formats at all, your model is outside that supported set. Don’t keep hunting through menus. An older device that never offered HEIF capture is already saving in a broadly compatible format.
What You’re Giving Up, and How to Undo It
Apple describes HEIF as using less storage than JPEG while preserving comparable visual quality. That’s the whole trade. Most Compatible gives you files that older operating systems, websites, forms, and applications accept more readily. High Efficiency gives you more photos in the same space.
Practical rule: Flip the switch for a recurring need. Convert individual files for an occasional one.
You can reverse this anytime. Go back to Settings, Camera, Formats and choose High Efficiency, and new photos return to the smaller format. Nothing already saved changes in either direction.
Still photos are what this setting is about here. Live Photos carry a short moving clip alongside the still image, and video has its own format behavior, so don’t assume a JPG still means the motion part travels with it. If someone needs the moving version, send it as a Live Photo or video, not as a converted still.
If you came here because of photos already on your phone, you can skip this switch entirely. The export steps below make JPG copies of those without touching what your camera does tomorrow.
Export Existing iPhone Photos as JPG
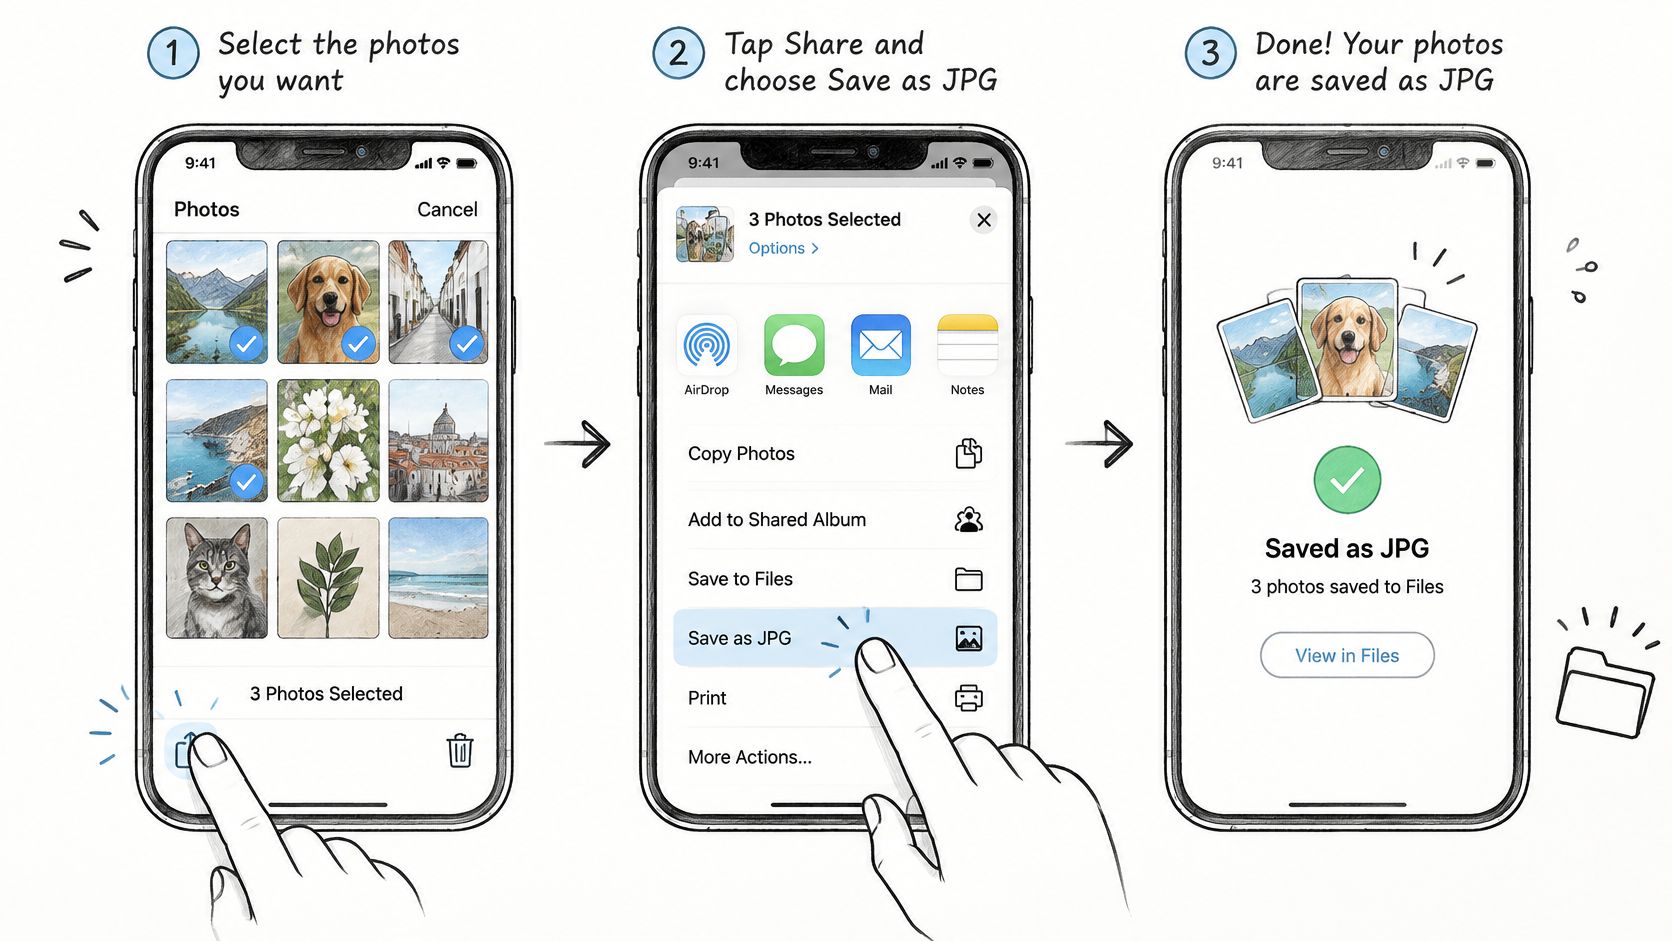
You don’t need to retake anything. Photos already in your library just need a copy made in the format the other side accepts. The screens below show the selection and saving flow on the phone itself.
Share a JPG Copy From the iPhone
- Open Photos and select only the shots needed. Use Select for a small set rather than sharing a whole album.
- Tap Share. It’s the square with an arrow pointing up.
- Choose Save to Files, Mail, or Messages. Compatible share targets commonly receive a JPEG copy even when the library original is HEIC.
- Open the saved or sent copy and check the name. If you used Save to Files, confirm it ends in .jpg before you upload it anywhere.
That last check matters. The original in Photos still says HEIC, because you made a copy, not a replacement. Always attach the copy you just verified, not the library original out of habit.
Transfer to a Computer as JPG
- On the iPhone, open Settings, then Apps, then Photos. On some iOS versions it’s Settings, then Photos.
- Under Transfer to Mac or PC, choose Automatic. This is the setting that asks for compatible files during import.
- Connect the phone and import with Photos or Image Capture on a Mac, or your PC import tool.
- Choose Keep Originals instead only when you need HEIC on the computer. You can convert that copy afterward.
- Stop after a small test set. Check the first few files before importing hundreds.
Apple’s guidance on transferring photos notes that imports through Photos, Image Capture, or a PC may be converted to JPEG with Automatic selected, while iCloud Photos preserves the original full-resolution file. So downloading from iCloud is not a dependable convert to JPG step by itself. If your files arrive from iCloud as HEIC, nothing is broken. Convert those copies as a separate step.
The short walkthrough below shows the same selection and sharing motions if you’d rather watch once before tapping along.
Test One File Before You Do the Rest
- Extension: The name ends in .jpg or .jpeg, not .heic.
- Pixel size: The dimensions match the original, so nothing was shrunk unnoticed.
- Orientation: The picture is upright, not sideways.
- Metadata: The date taken is still present if the recipient needs it.
Once that one file passes all four checks and opens on the receiving device or site, run the rest the same way. Don’t email originals back and forth trying different apps. If you need many files at once, or you want to choose the output quality yourself, use the batch approach in the closing section instead.
Keep Quality and Details When You Convert
Convert straight from the original HEIC file, then avoid saving the JPG repeatedly. JPEG is lossy, so each re-save can discard more image information and create blocky patches or fuzzy edges. One conversion is usually enough for sharing or submitting a photo.
JPEG’s main advantage is compatibility. Browsers, office software, printers, and online forms widely accept it. When a form requires JPG, change the photo’s format to JPEG rather than changing how your iPhone saves every future photo.
Settings That Work for Most Photos
- Quality around 85: A practical setting for web forms, email, and everyday sharing. It keeps the file manageable while looking close to the original at normal viewing sizes.
- Lossless for graphics and screenshots: Sharp lines and text can show compression more clearly than a family photo. Choose the Lossless option for those images.
- Original pixel size: Keep the original size unless a portal lists a maximum edge. If it does, choose that limit so you don’t shrink the photo more than required.
HEIC files are usually noticeably smaller than JPGs of the same photo. That’s the storage trade-off: HEIC saves space, while JPG works with more devices, apps, and websites. A larger JPG doesn’t necessarily look better; the format stores the image less efficiently.
Three Checks on Your Test File
Start with orientation. An iPhone can store rotation information separately from the picture’s pixels, so a converter that ignores it may save the photo sideways. ConvertHEICto applies the iPhone’s stored rotation before saving, so the photo comes out upright.
Next, check metadata. Date taken and camera information are kept. GPS location is removed by default, unless you choose to keep it.
Finally, check color. iPhones can capture photos using the wider Display P3 color profile. ConvertHEICto carries that profile over when possible, or converts colors to sRGB for formats that can’t store a profile. On your test file, compare a face and a sky with the original to see whether the colors look right.
Once the test JPG opens correctly on the other device or website, use the same settings for the remaining photos.
Convert Only the Photos a Recipient Needs
Here’s the decision in plain terms. If your camera should stay space-efficient, leave Formats on High Efficiency and convert only the shots a portal, client, or Windows user can’t open. If every future photo must be JPG because of how you work, you’ve already set Most Compatible, and conversion is only a cleanup job for the old library. Many people are in the first group.
For a batch, open the converter in your browser, including Safari on iPhone or iPad, not only on a desktop computer. Add the HEIC photos by choosing them or dragging and dropping them in, choose JPG, set your quality, and download the results, individually or together. The guide to using a HEIC to JPG batch converter covers handling a full set in one pass.
Your photos never have to sit on a stranger’s server just to change a file ending.
Conversion runs inside your own browser on your device. There’s no upload step and no server that keeps a copy, which matters for ID uploads, medical documents, and family photos you’d rather keep private. The resulting JPG output opens on every device, app, and website, so the person on the other end doesn’t need anything installed.
A quick example ties it together. Say a landlord’s portal needs four photos of your current place, all shot over the last year. Those four are already HEIC, so a camera setting won’t help. Convert just those four, upload them, and your camera keeps saving every new photo at the smaller size.
After the recipient confirms the files were accepted, delete the extra JPG copies you don’t need. They’re the larger versions, and keeping duplicates of everything fills the phone you were trying to protect. Your HEIC originals remain your compact master copies.
If you only ever had one attachment, stop at the Share sheet and skip the converter entirely. Match the tool to the size of the job.
Convert the exact photos that form or recipient is waiting for, right on your iPhone, iPad, or computer, with no upload and no server copy of your pictures. Open ConvertHEICto, add your HEIC files, choose JPG and your quality, and download copies that open anywhere.