
You have the photo on your iPhone, it looks fine, and the upload form in front of you rejects it. Or you’ve emailed it to a colleague on Windows and they’ve replied that it won’t open. The file ends in .heic, the form wants a JPG, and you need a copy that works now without turning a sharp photo soft or sending your exact location along with it.
That’s the main task when you’re learning how to convert HEIC to JPG. The conversion itself is quick. Getting the quality, orientation, color, and metadata right in the same pass is what saves you from a second attempt, a rejected upload, or a photo that reveals more than you meant to share.
Table of Contents
- Choose the Right Method and Why Renaming Fails
- Set JPEG Quality, Orientation and Color Without Guesswork
- Strip GPS and Keep Only the Metadata You Need
- How to Convert HEIC to JPG on iPhone, Mac and Windows
- Batch Conversion and Fixing Failed Conversions
- Final Checklist and First Test Conversion
Choose the Right Method and Why Renaming Fails
Which method fits the photos you have in front of you right now? Start there, not with whichever app you opened first. A single photo for a form, a library export for a client, and fifty trip photos for relatives on Windows and Android are three different jobs, and each method trades quality control against speed and location handling in a different way.
HEIC to JPG Methods Compared
| Method | Best for | Quality control | Location data |
|---|---|---|---|
| iPhone Share sheet or AirDrop transfer | Sending one or two photos quickly | None, iOS sends a JPEG | Turn Location off in the share options |
| Mac Photos export | Mac owners exporting from their library | JPEG quality slider in the export dialog | Include Location Information checkbox |
| Mac Preview export | Single files stored on a Mac | Quality slider on Export | Metadata options in the export dialog |
| Windows Photos or Paint with HEIF Image Extensions | Windows PCs receiving HEIC files | Limited, Save as JPEG | Check the saved JPG in Properties and remove location before sharing |
| Browser converter (ConvertHEICto) | Mixed devices, batches and Android or Windows recipients | JPEG quality value or Lossless | Removed by default, optional to keep |
Read the table by the recipient, not just by your device. If the photo stays inside Apple’s apps, almost any route works. If it’s going to a web portal, a print shop, or someone else’s PC, you want explicit control over quality and a clear switch for location, because that’s where silent defaults cause trouble.
The Decision Rule I’d Use
- One or two photos on a Mac: Use Preview for a loose file or Photos for a library photo. You get a quality slider and you can see where the copy lands.
- A batch across devices, or a Windows or Android recipient: Use a browser converter. You set quality and location handling once and apply it to the whole set, instead of opening files one by one in Paint.
- Sensitive photos or a public recipient: Keep conversion on your own device and remove location in every method. That applies to family photos, documents, medical images, and anything headed for a listing or a public post.
If you’re weighing the formats themselves before you commit a whole library, the comparison in HEIC vs JPG and when each format wins is useful background. For most sharing jobs, though, you don’t need to pick a permanent winner. Keep the HEIC as your original and make the JPG as the copy that leaves your hands.
Practical rule: Convert a copy, check the copy, and only then send it. The original HEIC stays untouched until the JPG has opened correctly somewhere else.
Why Renaming the File Doesn’t Work
Renaming photo.heic to photo.jpg changes nothing inside the file. The data is still encoded the HEIC way, so a viewer or upload form that expects JPEG data either fails to open it or rejects it outright. The extension is a label, not the format.
A real conversion does actual work. According to Apple’s support page on HEIF and HEVC media, Apple adopted HEIF as the default still-image format in iOS 11, released in 2017, with HEIF images captured and stored using the HEVC codec and commonly using the .HEIC extension, alongside HEIF support in macOS 10.13 High Sierra. Converting therefore means decoding the HEIF container and its HEVC-compressed image, rendering orientation and color information, and encoding a new JPEG bitstream at a quality level you choose. That’s why a genuine conversion changes the file size, usually making it larger, and why the exported file opens in places the renamed one didn’t.
This is also why the compatibility problem appeared so suddenly. Photos from newer iPhones and iPads could use a more storage-efficient format that older operating systems, websites, email clients, and document-upload systems didn’t universally support. JPG is the safe handoff format, not the better master copy. Keep the original HEIC until you’ve checked the JPG, because the conversion can’t be undone from the JPG alone.
Set JPEG Quality, Orientation and Color Without Guesswork
JPEG is lossy. Every time you encode to JPEG, the encoder discards some image information to save space, and you don’t get it back. So the rule is simple: decode the HEIC once, encode the JPEG once, and don’t keep reopening and resaving the JPG to make small adjustments. Make your crop, resize, and rotation decisions first, then export.
JPEG Quality Bands and What They Cost
| Quality setting | Typical use | File size effect | Visible risk |
|---|---|---|---|
| 100 | Copies you will edit again | Largest JPEG | Minimal visible loss |
| 85 to 92 | Everyday sharing, portals and email | Moderate | Slight softening in foliage and gradients |
| 70 to 80 | Drafts and previews | Smaller | Noticeable softening in hair, text and shadow detail |
| Below 60 | Thumbnails only | Smallest | Blocky gradients and lost fine texture |
For most everyday work, I would start in the 85 to 92 band. The Library of Congress format description for JPEG supports treating quality around 85 to 92 as a reasonable starting range for general compatibility, while noting that repeatedly opening and saving a JPEG compounds quantization damage and that you should inspect foliage, hair, text, gradients, and shadow detail rather than judging by file size alone. Those are exactly the areas where aggressive compression shows first. If you need a lossless working copy for editing, export PNG or TIFF instead of pushing JPEG to 100 and assuming it’s the same thing.
Judge the file size after you’ve looked at the picture, not before. A smaller file that turns tree foliage into mush or makes a scanned document’s text fuzzy isn’t a saving, it’s a failed conversion you’ll redo. If a portal has a size limit, resize the longest edge to that limit before encoding, since shrinking a large iPhone image cuts bytes cleanly, while enlarging a small one can’t restore detail that isn’t there.
Don’t chase the smallest file. Chase the smallest file that still survives a zoom into the busiest part of the photo.
Orientation and Color, Settled Before You Export
Your JPG should come out upright, with the iPhone’s rotation applied to the pixels themselves. Once that rotation is applied, the orientation tag needs to be reset, otherwise other software may apply the rotation a second time and show the photo sideways. A sideways preview on a recipient’s screen is almost always this double rotation, not a corrupt file.
Color needs the same deliberate choice. iPhones capture in Display P3, a wider color space that Apple screens handle well. Keep Display P3 when the photo will stay on Apple devices. Convert to 8-bit sRGB for the web, Windows, upload portals, and print shops, because software that ignores color profiles will show P3 photos muted or oversaturated. When you’re changing format to JPEG for a specific destination, sRGB is the predictable choice for anything outside your own screens.
Finish with a three-part test. Open the JPG in a second viewer, not the app that made it. Zoom into a textured area such as hair, leaves, or fabric. Then compare the file size against the quality you chose. If those three agree, the settings are right for the rest of the set.
Strip GPS and Keep Only the Metadata You Need
Changing the format doesn’t make a photo private. A JPG can carry the same identifying fields as the HEIC it came from, so metadata is a step in the conversion, not something you think about after you’ve already sent the file.
HEIC photos can hold capture time, camera information, GPS coordinates, XMP, IPTC, and ICC color profiles, as the overview in XConvert’s explanation of what HEIC is sets out. A converter can copy some or all of that into your JPG. That creates two separate risks: the photo may be uploaded to a third party during conversion, and its location may travel inside the finished file.
Metadata Fields in a Converted JPG
| Field | What it reveals | Keep or remove | Why |
|---|---|---|---|
| GPS coordinates | Exact place the photo was taken | Remove by default | Most identifying field |
| Capture date and time | When the photo was taken | Keep for cataloguing | Helps sorting and archives |
| Camera make and model | Device details and settings | Keep for photo workflows | Can narrow identity when shared widely |
| ICC color profile | Color space for accurate display | Keep, or convert to sRGB | Prevents color shifts on other screens |
| Orientation tag | Rotation after transforms are applied | Reset after rotating | Avoids double rotation |
| XMP and IPTC text | Captions, names, keywords and notes | Remove before public sharing | Can contain names or notes |
The default rule is remove GPS whenever a photo leaves your hands. Keep capture date and camera settings when you’re cataloguing your own library or archiving work, because you’ll want them for sorting and searching later. That’s selective retention, and it’s the middle path between two poor defaults.
Keeping everything is wrong for public sharing, because coordinates can pinpoint a home address from an ordinary snapshot. Removing everything is also wrong sometimes. A real estate listing photo still needs correct color and orientation, and stripping the profile can make rooms look dull or oddly tinted on the listing site. A working photographer legitimately needs camera settings and color profiles intact for their workflow, so for their archive copies, keeping everything except what a client shouldn’t see is the correct call.
Where the conversion happens matters just as much. Our photos are converted inside your own browser on your device, with no upload step and no server that keeps a copy, which removes the first risk entirely. Whatever tool you use, spend two minutes checking the result. Open the JPG’s info or properties panel, confirm no coordinates appear, and send a test copy to yourself before you share the set.
How to Convert HEIC to JPG on iPhone, Mac and Windows
Each route below leaves your original HEIC untouched unless a step says otherwise. You’re always making a copy, which is what you want. Steps 2 and 3 are the built-in routes here with an explicit location switch. The Windows and browser routes need a separate check before you send.
The three platform routes at a glance:
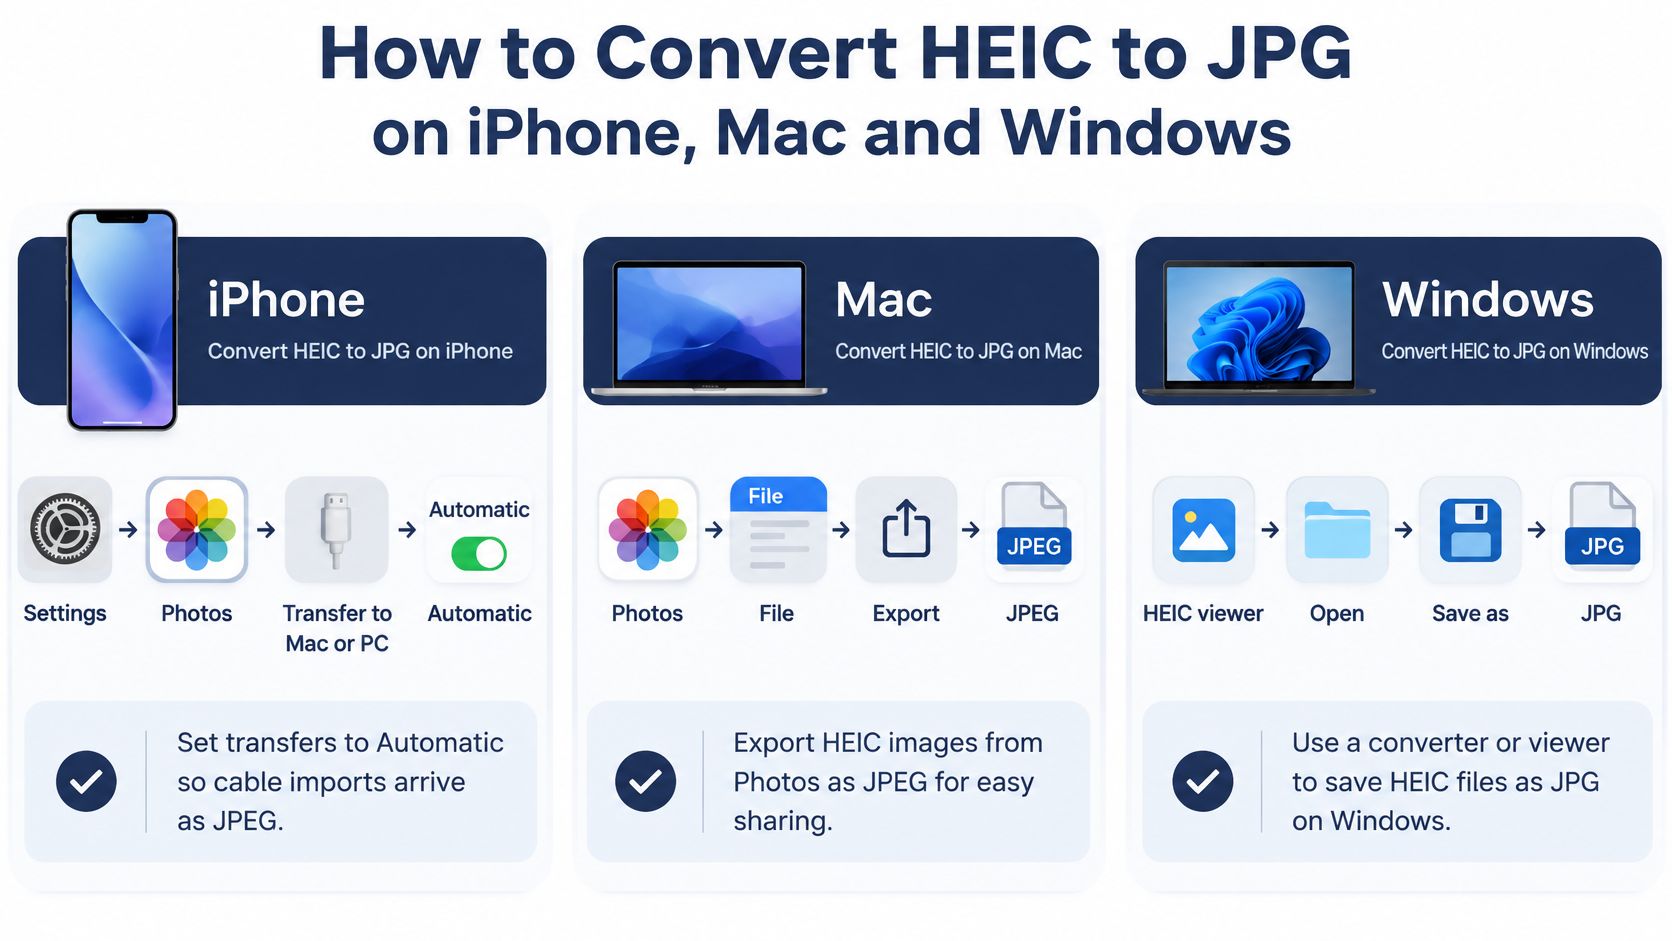
iPhone Settings and Quick Sends
- Set cable transfers to convert automatically. Open Settings, then Photos, then Transfer to Mac or PC, and choose Automatic. Photos you transfer by cable then arrive as JPEG, so you skip conversion for routine imports.
- Send a single photo without its location. Open the photo, tap Share, tap Options at the top, and turn Location off before you send. Do this before choosing the app or contact, because the option applies to that share.
These two cover most iPhone-only jobs. The first changes future transfers, the second handles the one photo you need to send right now, and neither touches the original in your library.
Mac Photos and Preview
- Export from Mac Photos with quality and location under your control. Select the photos, choose File, then Export, then Export, set Format to JPEG, set quality in the 85 to 92 range, and untick Location Information. This is the most controlled built-in Mac route, because all three decisions sit in one dialog. Below 85, gradients and skin tones start to show blocking; above 92, file size climbs fast for little visible gain.
- Export a single loose file in Preview. Open the file, choose File, then Export, set Format to JPEG, and drag the Quality slider. Preview suits files that live in folders rather than in your Photos library, and you pick the destination in the same dialog.
Windows and the Browser Route
- Open and save on Windows. Install HEIF Image Extensions from the Microsoft Store so Windows can read the file, open it in Paint, then choose File, Save as, and JPEG picture. Without the extension, the file may not open at all, which looks like corruption but isn’t. Paint writes a fresh JPEG, so open the saved file’s properties and confirm no coordinates remain before you send it.
- Convert in the browser for mixed devices. Add the photos to the converter, pick JPG, set the quality, then download the results. The conversion runs in your browser on your device, with no upload step and no server copy. That is the route I’d pick when recipients are on several platforms, because the same settings apply to every file.
What a Sound Conversion Does Underneath
Behind those menus, a proper converter decodes the HEIC image item, applies the stored rotation and mirroring to the pixels, handles the color profile, and writes a new JPEG. The Library of Congress format description for HEIF and HEIC describes HEIC as an HEIF container commonly carrying HEVC-coded image items under ISO/IEC 23008-12, and notes that container-level irot rotation and imir mirroring transforms are authoritative and should be applied before writing JPEG, rather than relying on EXIF Orientation alone. That’s why a good tool produces an upright JPG even when a basic viewer showed the original sideways.
You don’t need to manage any of that by hand. You do need to verify the result the same way regardless of platform. Check the dimensions, confirm the photo is upright in a second viewer, look at the color on a non-Apple screen if that’s where it’s headed, and confirm location is absent when you chose to remove it. If one file passes those checks, the same settings will handle the rest of the set.
Batch Conversion and Fixing Failed Conversions
Say you’ve got a folder of two hundred photos from a trip, or a set of scans that need to go into a report. Converting them one at a time through Preview or Paint will take the rest of the afternoon, and you’ll apply settings inconsistently by the fortieth file. Batches need a folder routine first and a converter second.
Set up the routine before you convert anything:
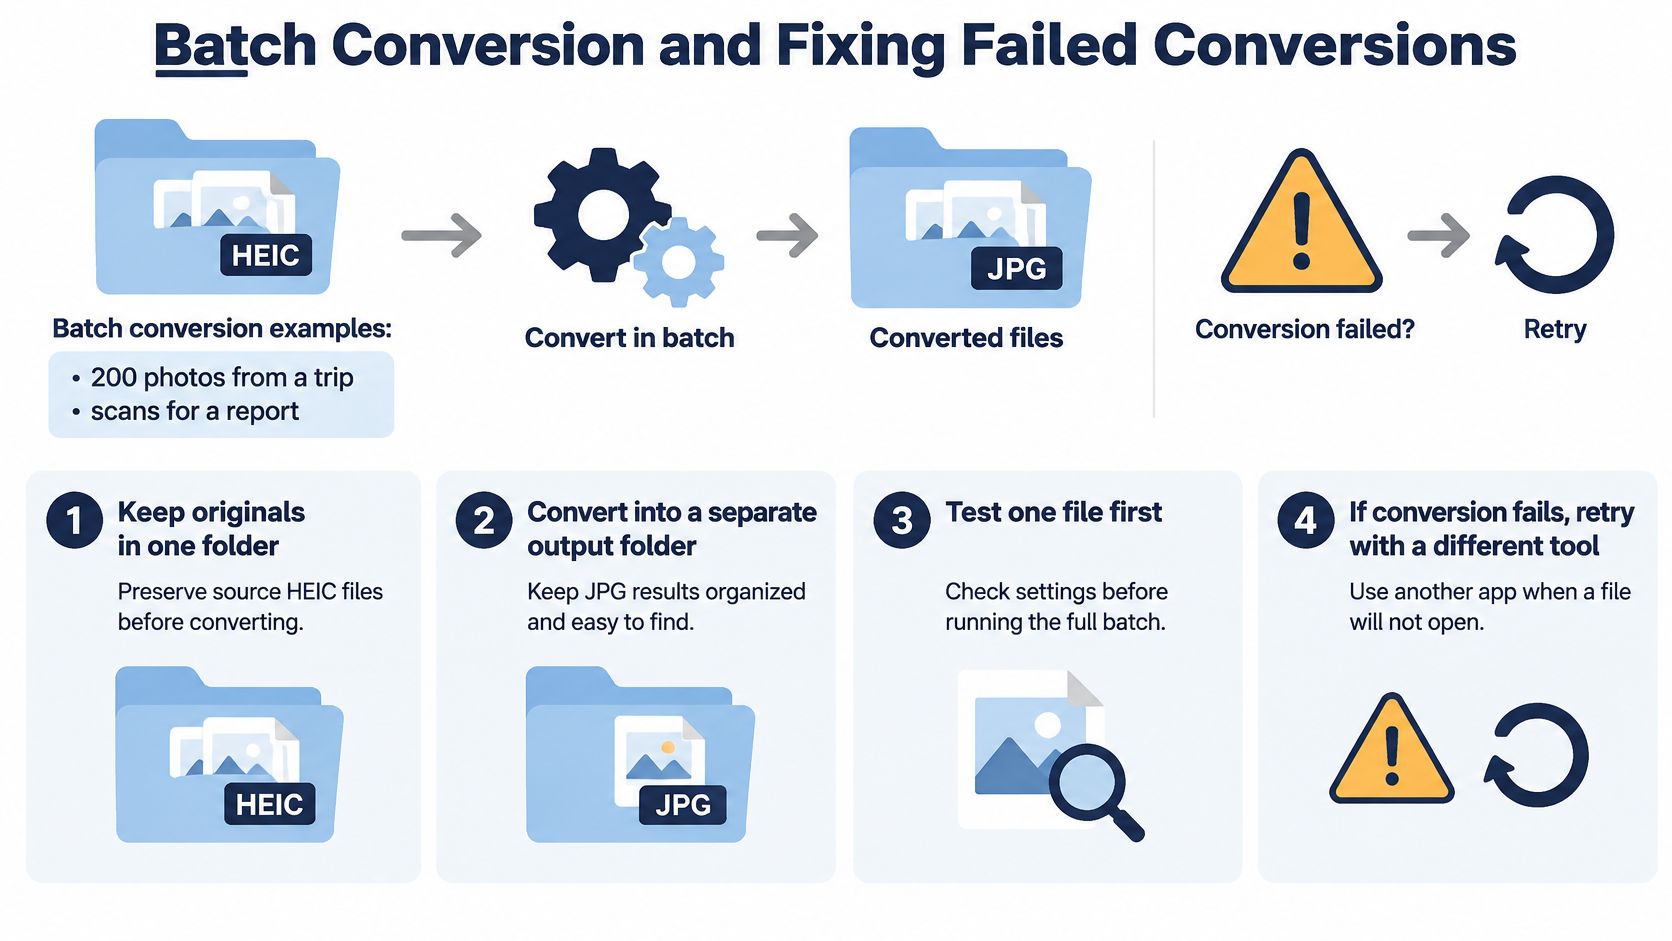
Keep the originals in one folder and convert into a separate output folder, so a failed run never risks your masters. Name outputs with dates at the front of the filename, so they sort chronologically in any file browser or upload dialog. Then convert one file, check it fully, and run the rest with those settings. If you’re setting up a repeatable routine, the guidance on a HEIC to JPG batch converter workflow covers the folder and download side in more detail.
The Failures You’ll Actually Meet
- iCloud placeholders that won’t convert: The photo hasn’t downloaded to your device yet, so there’s nothing to decode. Set Photos to Download and Keep Originals and wait for the library to finish before converting.
- Wrong orientation across the batch: Check the first and last images before you send anything. If they’re sideways, the rotation fix needs applying before saving, and one corrected test file tells you whether the whole batch will follow.
- A portal rejects the file: The image is usually too large, not the wrong format. Resize the longest edge to the portal’s limit before saving. Shrinking keeps detail proportional, while enlarging can’t add any.
- Colors shift on the website: The site is ignoring your Display P3 profile. Convert to sRGB and re-export, then compare on the destination page rather than on your own screen.
- The file is still too big: Lower quality in steps of five and compare each result against the previous one. Big jumps overshoot, and you’ll trade away detail you didn’t need to lose.
If the same failure repeats across a batch, stop. Fix one file completely, then rerun the rest with the corrected settings.
That single rule saves more time than any faster tool. A batch multiplies whatever settings you give it, including the wrong ones, so ten minutes spent proving one file is cheaper than inspecting two hundred flawed outputs.
Final Checklist and First Test Conversion
Whatever route you chose from the method table, the same five checks close the job. Run them on the JPG, not on the preview inside the app that made it.
- It opens in a second app: Use a different viewer from the one that exported it, ideally on the recipient’s type of device.
- It’s upright: No sideways or double-rotated photos, checked at full size rather than as a thumbnail.
- Colors look natural: Skin tones and whites are the fastest tell. If they look gray or oversaturated, the profile conversion needs another look.
- GPS is absent if you removed it: Open the info panel and confirm no coordinates or map appear.
- The original HEIC is still in place: Your master copy should be exactly where it was before you started.
Keep that last point firm. The converter is free to use, and you can add as many iPhone photos as you like, choose an output format, and download the results, but the service is provided as is, without warranties of any kind. No converter can guarantee every file will convert or that the result will suit your purpose, which is exactly why originals stay kept.
ConvertHEICto is one browser option for batches and mixed-device recipients, offering JPG with a quality value or lossless output, and every step above works without it using the built-in routes. Pick whichever route matches your devices, but make the final move the same: convert one test photo first, check it on the destination system itself, whether that’s the upload form, the recipient’s phone, or the print shop’s preview, and only then convert the full set. One verified file is proof. Two hundred unchecked files are a gamble.
Ready to run that first test photo? ConvertHEICto converts your HEIC files to JPG inside your own browser, with your choice of quality setting and GPS removed by default, so nothing is uploaded while you work. Add one photo, check it on the form or device it’s headed for, and then bring the rest of the set through with the same settings.