
.jpeg and .jpg are the same JPEG format, so renaming the extension is enough in most cases. A real re-save is needed when you want to change the image’s size, quality or metadata, or when the file contains another format, such as HEIC or PNG.
That distinction can save you an unnecessary upload and an avoidable round of compression. Before choosing a JPEG file to JPG converter, check whether you need a different filename or a different image file.
Table of Contents
- Why .jpeg and .jpg Are the Same Format
- Which Method Fits Your Goal
- How to Rename a JPEG File to JPG
- How to Re-save a JPEG as JPG in Common Apps
- Mislabeled Files, Metadata and Repeated Saves
- Keep the Original and Pick Your Next Step
Why .jpeg and .jpg Are the Same Format
.jpeg and .jpg identify the same JPEG image format, not different levels of quality. Say you receive holiday.jpeg, but a document portal asks for a JPG. If the file already contains valid JPEG data, changing its name to holiday.jpg gives the portal the extension it expects without altering the photograph.
JPEG names the standardized compression technology. The extension is the label attached to a particular file. Neither spelling tells you whether the photo was saved with gentle compression, reduced dimensions or extensive metadata.
The standard’s history helps explain why JPEG is much more than a filename convention:
According to the ITU’s history of JPEG, development began in 1986, the specification was approved by the then-CCITT, now ITU-T, as Recommendation T.81 on September 18, 1992, and ISO/IEC 10918-1 was published in February 1994.
What happens inside the file
When you rename holiday.jpeg to holiday.jpg, your file manager changes the filename. It doesn’t open the image, recalculate its colors or compress it again. The compressed image data remains untouched, so renaming causes no image-quality loss.
JPEG became widely implemented across cameras, operating systems and editing applications. Open-source implementations, including the Independent JPEG Group’s software, helped make that compatibility practical. The result is a format you encounter in everyday photography, website publishing and document submissions.
A different source format changes the task. A HEIC photograph needs decoding and JPEG encoding before it becomes a JPG. Giving it a new suffix won’t perform those operations.
For a quick first check, open the file in a photo viewer. If it displays, you know the image is readable, but that alone doesn’t prove it’s JPEG, because viewers often support several formats. Check the format information if you’re unsure, then decide whether the receiving app only needs the .jpg spelling.
Which Method Fits Your Goal
Use this comparison to match the method to the actual problem, rather than choosing a converter just because a form says JPG.
Method by goal: rename, re-save or convert
| Goal | Method | Re-encodes pixels? | Quality impact |
|---|---|---|---|
| Only the .jpg label is needed | Rename the file | No | None |
| Upload form or app rejects .jpeg | Rename the file | No | None |
| Smaller file size or lower resolution | Re-save with a quality or size setting | Yes | Additional saves can add loss |
| Remove GPS location before sharing | Re-save with metadata removed, or use a metadata-only tool | Yes with a typical image export; no with metadata-only removal | Export can add loss; metadata-only removal preserves pixels |
| Source is HEIC, PNG or WebP | Full conversion | Yes | Controlled by the JPEG encoder and quality setting |
Rename for a label-only requirement. An upload form may filter filenames before it examines their contents. A valid JPEG with an accepted extension can pass that initial check without any image processing. If it still fails, read the actual error: the form might require smaller dimensions or a lower file size.
Re-save for a changed deliverable. A photo intended for an email attachment may need a smaller exported copy. Reducing dimensions changes the image itself, while lowering JPEG quality changes how much detail the encoder keeps. Neither result comes from changing the extension.
Treat metadata as a separate decision. You don’t necessarily need to recompress a photo to remove location information. A metadata-aware tool can remove selected fields while retaining the compressed picture, whereas a typical editor’s export may encode the picture again.
Convert when the original encoding is different. This matters especially for iPhone photos received as HEIC. The HEIC versus JPG comparison explains the format distinction behind that compatibility problem.
Practical rule: Choose the smallest intervention that solves the receiving app’s requirement.
Before applying your chosen method to a folder:
- Keep an untouched copy: Especially before an export that could overwrite the source.
- Test the destination: A successful preview doesn’t guarantee acceptance by the upload form.
- Read the rejection message: An extension problem and a file-size problem need different fixes.
How to Rename a JPEG File to JPG
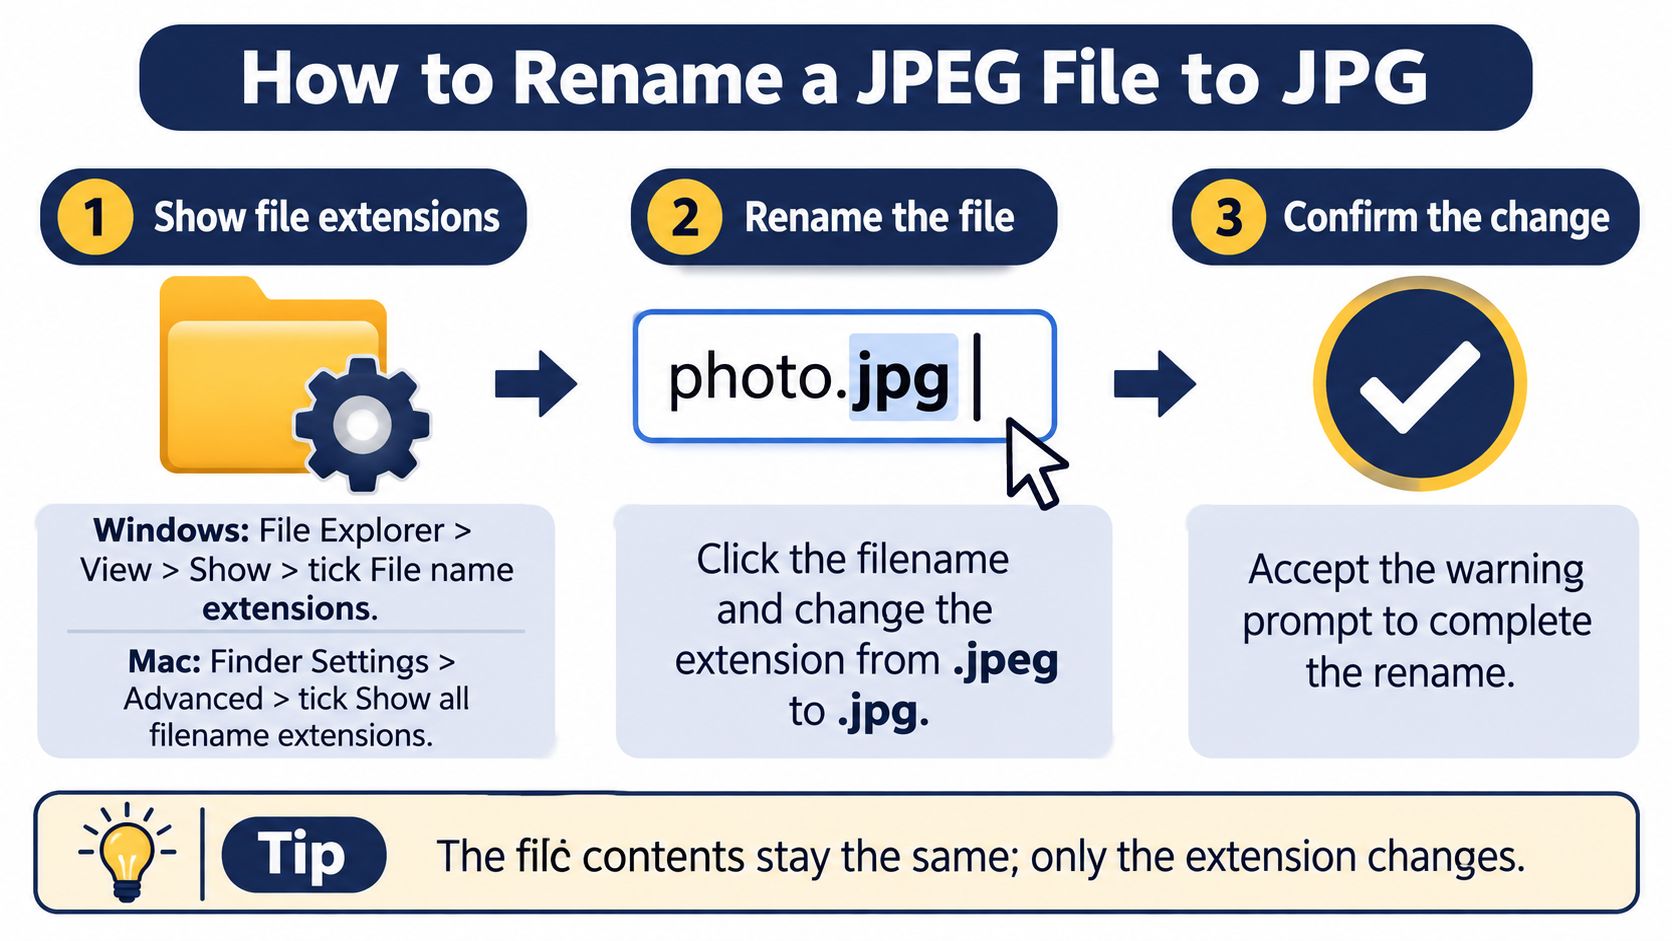
Work on a copy in a separate folder, particularly if you’re preparing important application documents or irreplaceable photos. Renaming is straightforward, but showing the full filename first prevents mistakes such as creating photo.jpg.jpeg.
The process is a filename change, not an image export:
Rename an individual file
-
Show file extensions. In Windows File Explorer, choose View > Show > File name extensions; on macOS, open Finder > Settings > Advanced and enable Show all filename extensions. You need to see the actual suffix, not just the photo’s display name.
-
Right-click the image and choose Rename. Select only the text after the final dot, leaving the descriptive filename intact.
-
Replace
jpegwithjpg, keeping the dot, then confirm the edit. For example,garden.jpegshould becomegarden.jpg, notgardenjpgorgarden.jpeg.jpg. -
Accept the extension warning for this specific change. Windows may warn that changing an extension could make a file unusable; choose Yes for a known JPEG, while macOS may offer Use .jpg.
-
Open the renamed copy in a photo viewer, then try it in the intended app or upload form. Leave the original folder untouched until the destination accepts the file.
The warning is generic because many extension changes really are inappropriate. Changing a spreadsheet extension to an image extension won’t change its contents. Here, you’re switching between recognized names for the same image format.
Rename several files or use a terminal
-
Preview batch changes before applying them. On Windows, Microsoft PowerToys PowerRename can target the extension; on macOS, select the copied files, right-click, choose Rename, then use Replace Text to replace
.jpegwith.jpg. -
If you prefer a command line, run
mv photo.jpeg photo.jpgin a macOS or Linux terminal, orren photo.jpeg photo.jpgin Windows Command Prompt. Run the command from the correct folder and put filenames containing spaces in quotation marks.
With batch tools, review the proposed filenames rather than replacing every appearance of jpeg indiscriminately. A descriptive name might contain that text before the extension, and you don’t want to change unrelated parts of your naming system.
If the command reports an existing destination file, stop and choose a different output name. Don’t overwrite another photograph merely to standardize the suffix.
How to Re-save a JPEG as JPG in Common Apps
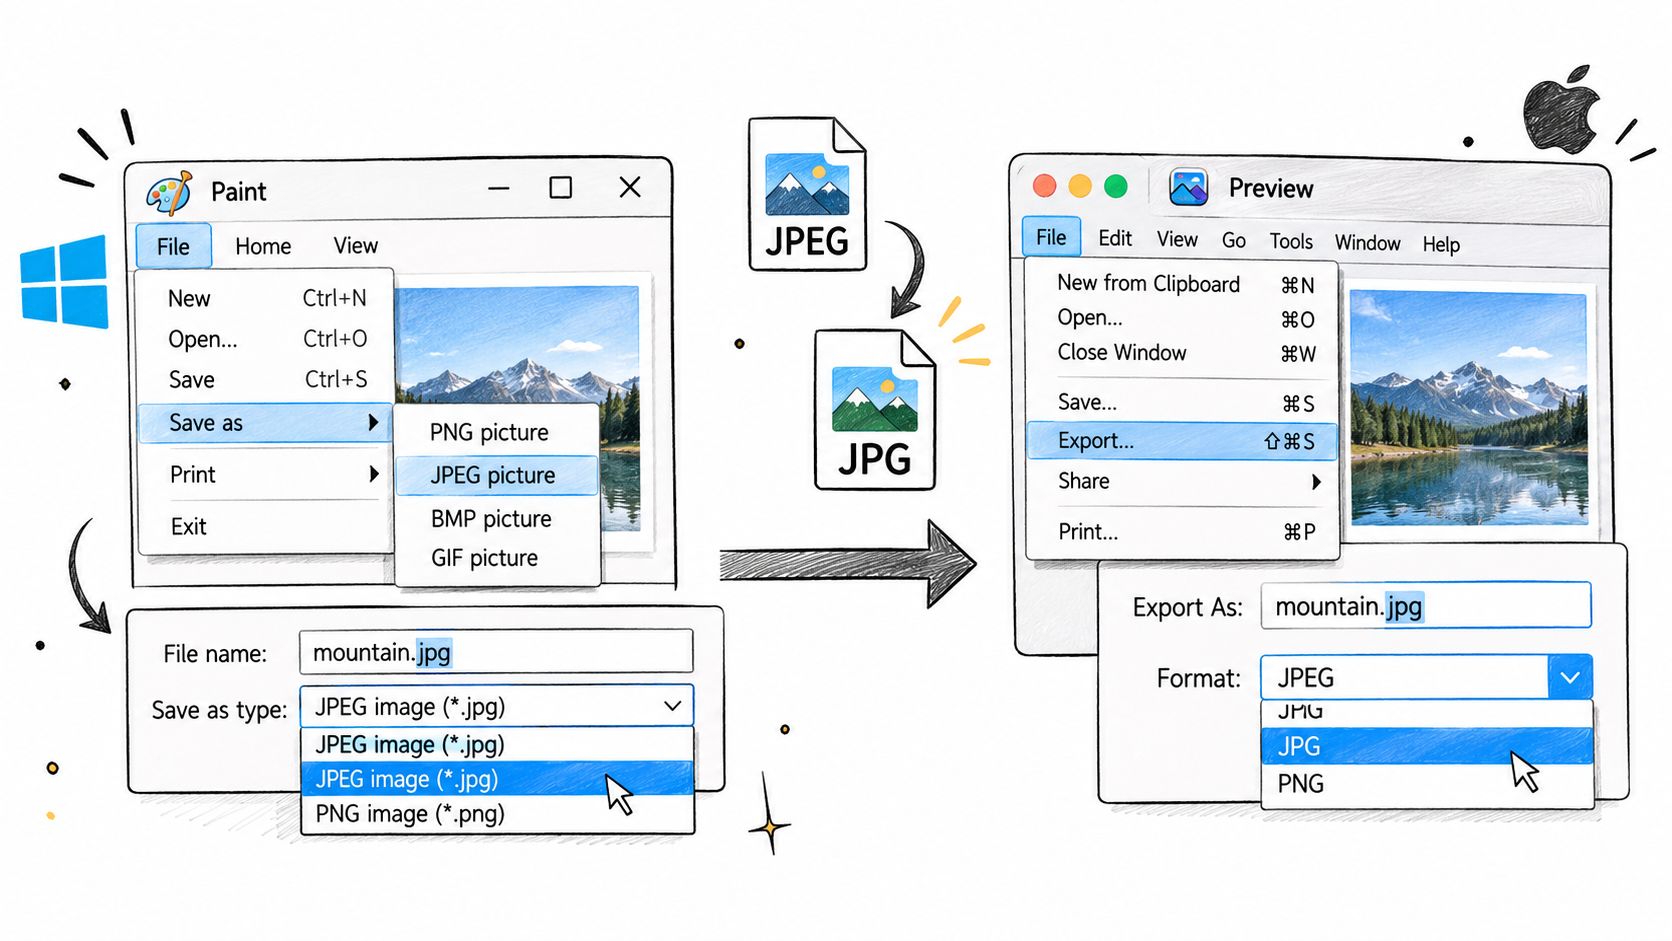
Use an editor when the output needs more than a new name. Paint on Windows and Preview on macOS can create a JPEG copy, although their available controls differ.
These are the basic export routes in the two applications:
Export a separate copy
-
Open the working copy. Right-click it and choose Open with > Paint on Windows, or open it in Preview on macOS.
-
In Paint, choose File > Save as > JPEG picture. In Preview, choose File > Export, then select JPEG from the format menu.
-
Use the controls your app provides. Preview offers a quality slider; Paint’s standard JPEG save workflow doesn’t provide the same explicit quality control, so use another editor if you need to tune compression precisely.
-
Resize only when the destination requires smaller dimensions. In Paint, use Resize; in Preview, choose Tools > Adjust Size, and keep the image proportions linked to avoid stretching faces or objects.
-
Save with a distinct name ending in
.jpgin your output folder. If the app asks whether to replace the original, cancel and choose a new filename instead.
The steps are similar for a non-JPEG source, but that operation is a genuine format conversion. The guide to changing an image format to JPEG covers that broader task.
Choose quality for the content
JPEG quality is controlled primarily by quantization, not the filename suffix. The technical overview of JPEG compression describes how quantization discards fine detail, with stronger compression producing more blocking, ringing and texture loss.
Quality setting by content type
| Content | Quality setting | Result |
|---|---|---|
| Photographs | Start high, then lower while inspecting a test export | Smaller files with mild softening when compression is restrained |
| Screenshots, text or diagrams | Highest practical setting | Better edge retention, though JPEG artifacts can remain |
| Already valid JPEG, label only | No setting, rename instead | No re-encoding |
Quality sliders aren’t a promise that every photograph will look equally good. Examine hair, foliage, fabric and smooth gradients, because these can reveal different compression problems. For text-heavy screenshots, keep a lossless original and avoid JPEG unless the destination requires it.
If you prefer a visual walkthrough, use the video alongside the export instructions:
- Reopen and inspect the saved output at actual-pixel size. Compare fine lettering, object edges and skin tones with the source, and verify that the new file meets the destination’s size requirement.
A high-quality export can’t restore detail discarded earlier. If the result looks poor, return to the untouched source and adjust the export, rather than trying to repair the newly compressed copy.
Mislabeled Files, Metadata and Repeated Saves
The most misleading case is a file that opens normally but contains a different format from the one its filename suggests. A viewer may recognize the contents despite the incorrect suffix, while a stricter upload service rejects it.
The MDN image-type guide identifies .jpg and .jpeg with the same image/jpeg MIME type; JPEG data uses the start marker FF D8 and end marker FF D9, which help distinguish the actual file structure from its name.
Match the symptom to the fix
-
Wrong encoding under a familiar name: A PNG renamed to
.jpegremains PNG data, even if a photo viewer opens it. Check the format in an image inspector or editor, then export a genuine JPEG if the destination requires it. A reliable converter checks the file signature and structure rather than trusting the suffix alone. -
Location information you didn’t intend to share: EXIF metadata can include GPS coordinates, capture time and camera settings. Use a tool with explicit metadata controls, remove the GPS fields, and inspect the exported file’s properties before posting it publicly. Don’t assume a new filename removes private information.
-
A photo that appears sideways elsewhere: Some apps display the picture according to its orientation tag, while others may handle it differently. If consistent display matters, use an export workflow that applies orientation to the pixels before saving, then check the result outside the editor. Deleting orientation metadata can leave the picture incorrectly rotated.
-
A photo that gets rougher during revisions: Repeated lossy exports can introduce additional degradation, especially when edits or encoder settings change. Keep an untouched master, make your edits from that master, and export a fresh delivery copy when needed. Don’t use each compressed delivery file as the starting point for the next revision.
Removing metadata and recompressing a picture are separate operations. Choose a metadata-only workflow when privacy is the only required change.
What to investigate first
For a camera photograph, start with orientation and location metadata. For a downloaded image with an unusual filename, check the actual encoding before attempting another rename.
For a screenshot, inspect small lettering and high-contrast edges after export. If those details matter more than file size, retain the original lossless version even when you must supply a JPEG copy.
You don’t need a hex viewer for routine renaming. Signature inspection is a diagnostic option for suspicious files, and matching the opening bytes alone isn’t a complete validation of a damaged or incomplete image.
Keep the Original and Pick Your Next Step
- Back up the originals in a separate folder. Keep those files out of the working directory so an accidental overwrite doesn’t replace your only source.
- Apply the method to a copy. Use a rename for an extension-only issue, an export for changed image requirements, or a genuine conversion for a different source format.
- Test the intended destination. Open the output in the receiving app or submit a test file to the form, rather than relying only on your editor’s preview.
- Confirm privacy and appearance. Check any metadata you intended to remove, along with orientation, colors and readable text.
- Finish with a tested file. Confirm that the complete workflow works before processing the remaining photos.
If your source is an iPhone HEIC or HEIF photo, our HEIC-to-JPG converter accepts photos through the file chooser or drag-and-drop. That is a different job from renaming an existing JPEG: the source image needs to be decoded and written in JPEG format.
Our processing runs inside your browser on your device. There’s no upload step and no server that keeps a copy of your photos.
Keep your source files regardless of the tool you choose. Our service is provided as is, without warranties, and we can’t guarantee that every file will convert or that the result will suit your purpose. A successful download still needs checking against the requirements of the app, website or document workflow where you’ll use it.
Your immediate next step is simple: back up the originals, choose a representative file, and test the method that matches its actual problem.
ConvertHEICto converts HEIC and HEIF photos into JPG when you need a genuine format change, with processing kept on your device. Visit the converter and try a backed-up photo, then check the downloaded JPG in the app or form where you need it.